Form
Form View allows you to arrange fields in a form to input data.

Form View Builder
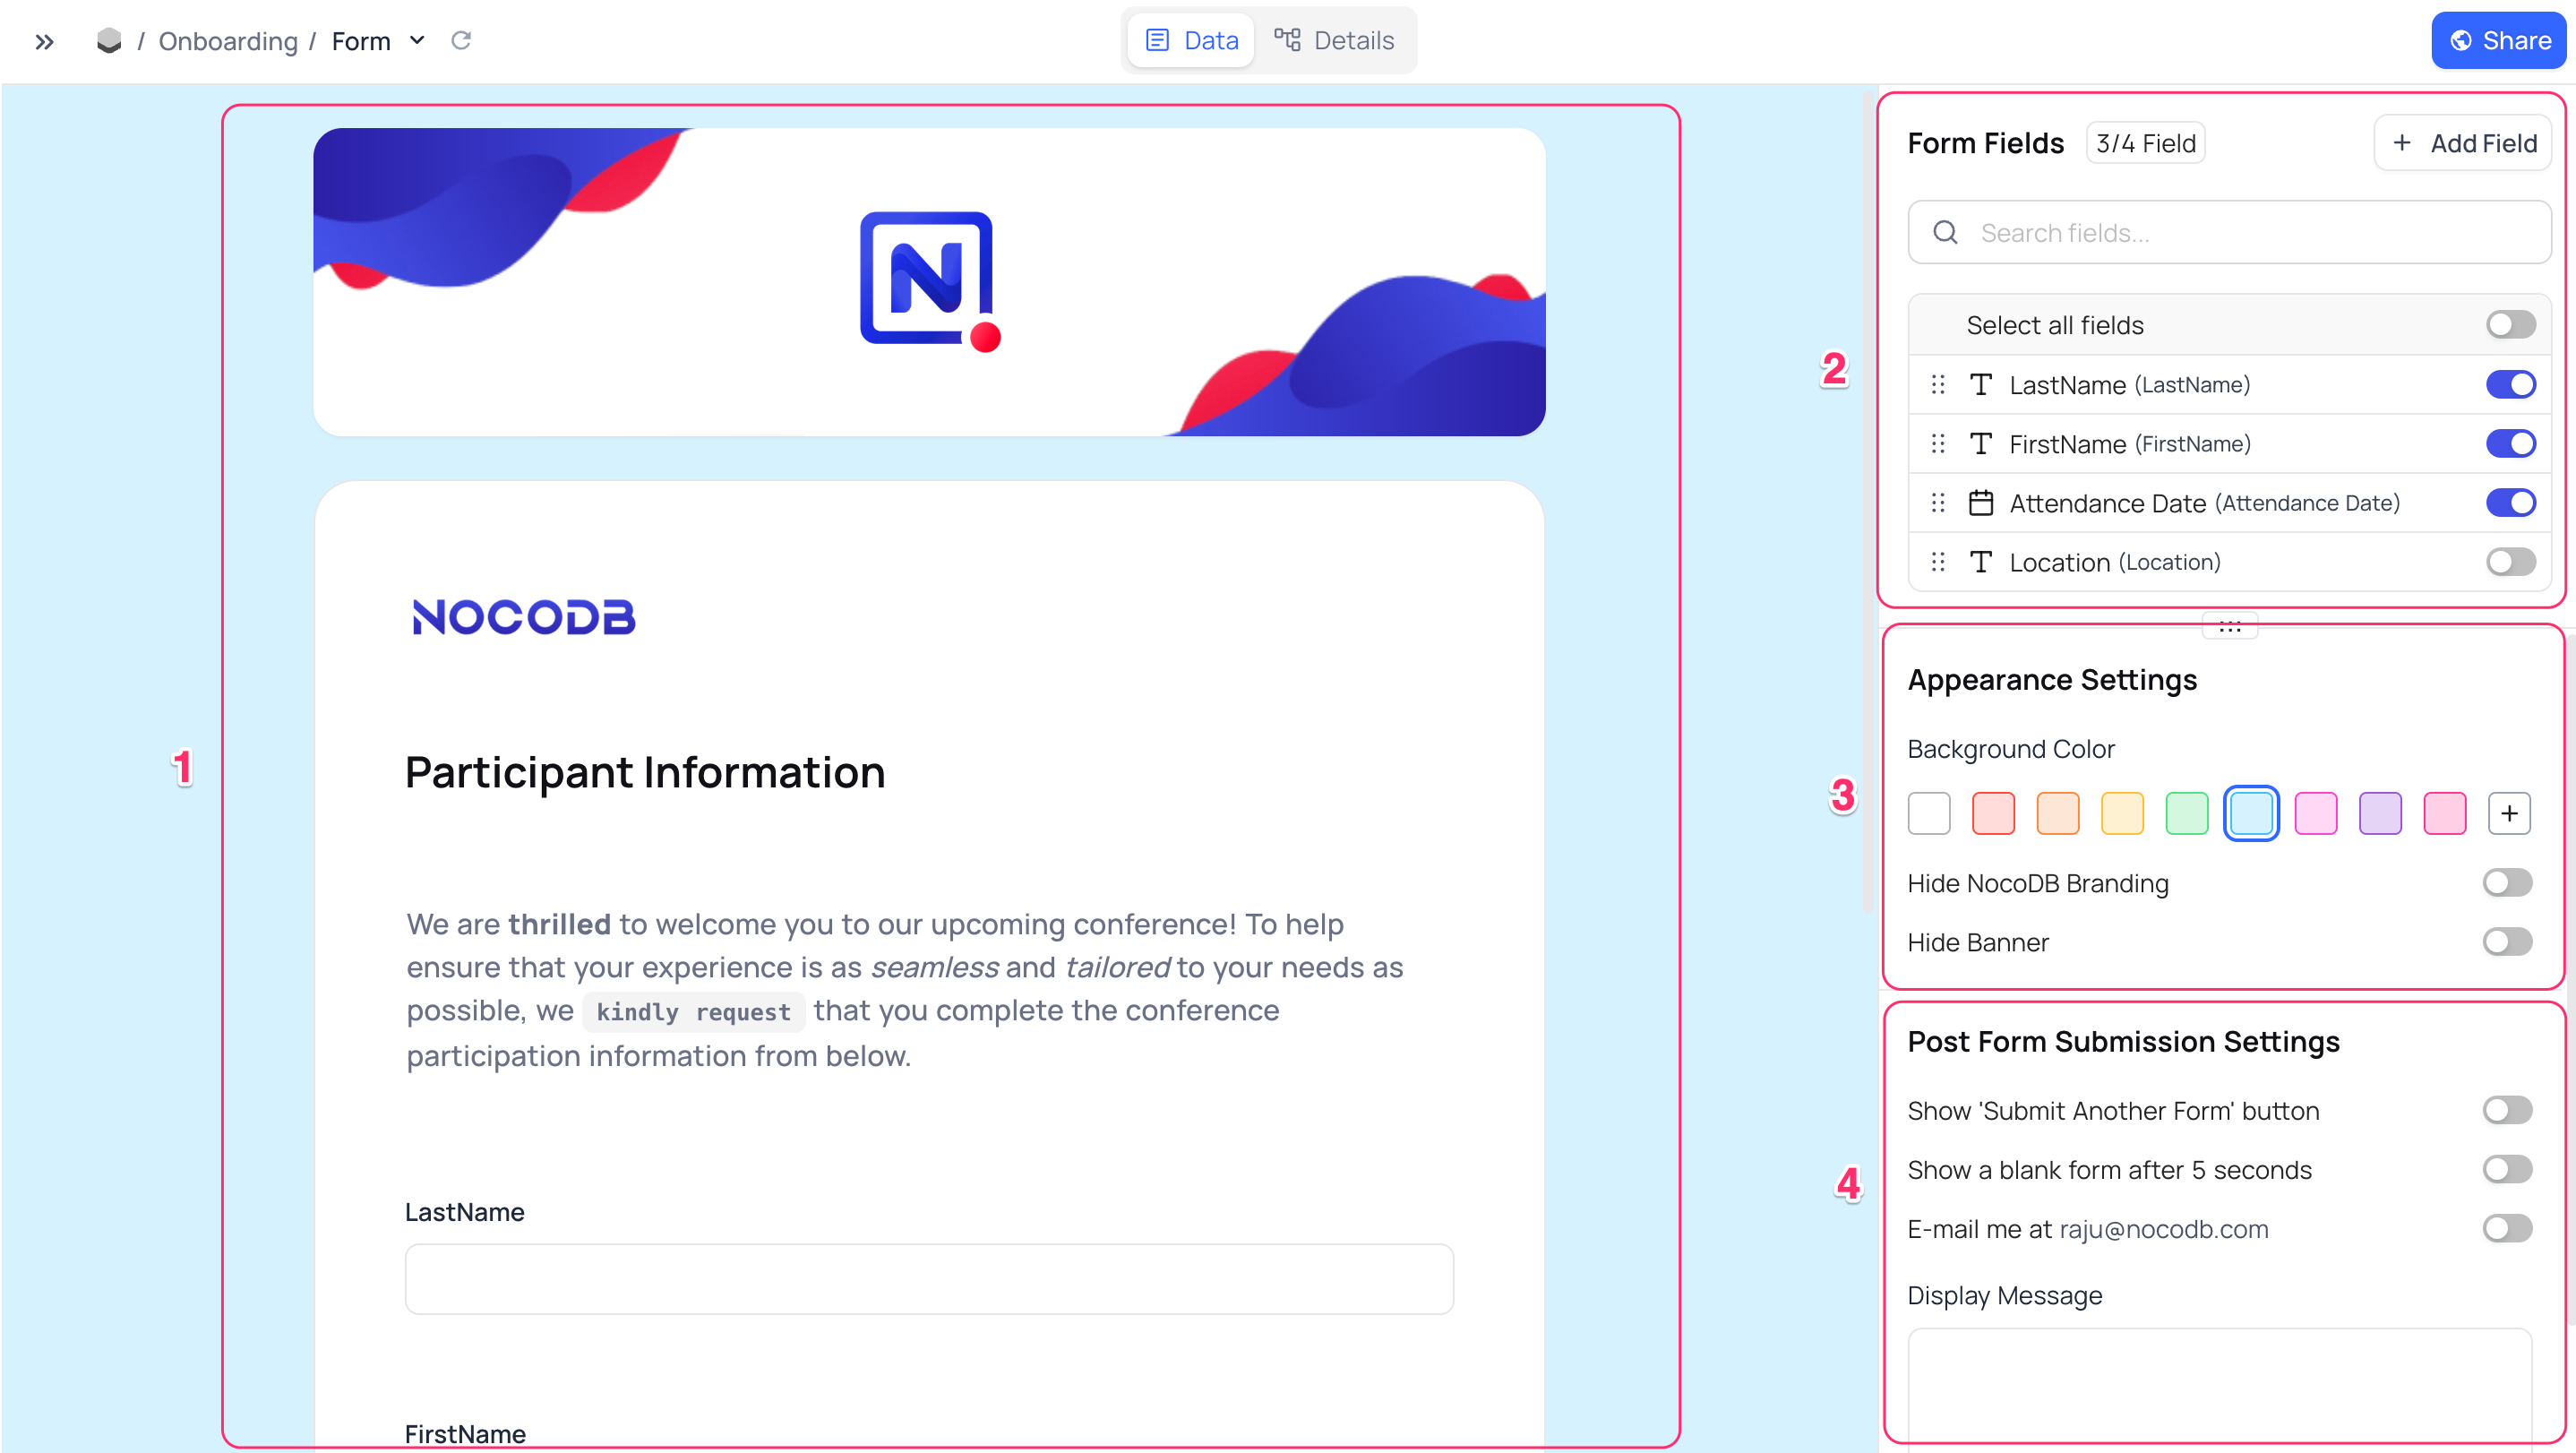
Form view builder layout can be divided into 4 sections:
- Form Area - This is the area where fields added to the form are listed. This area also acts as a preview of the form.
- Form Fields - This area lists all the fields available in the table. You can drag and drop fields for re-ordering and toggle the
hideswitch to remove fields from the form. - Appearance Settings - This is the area where you can configure the form view appearance settings like Background Color, Banner & Branding.
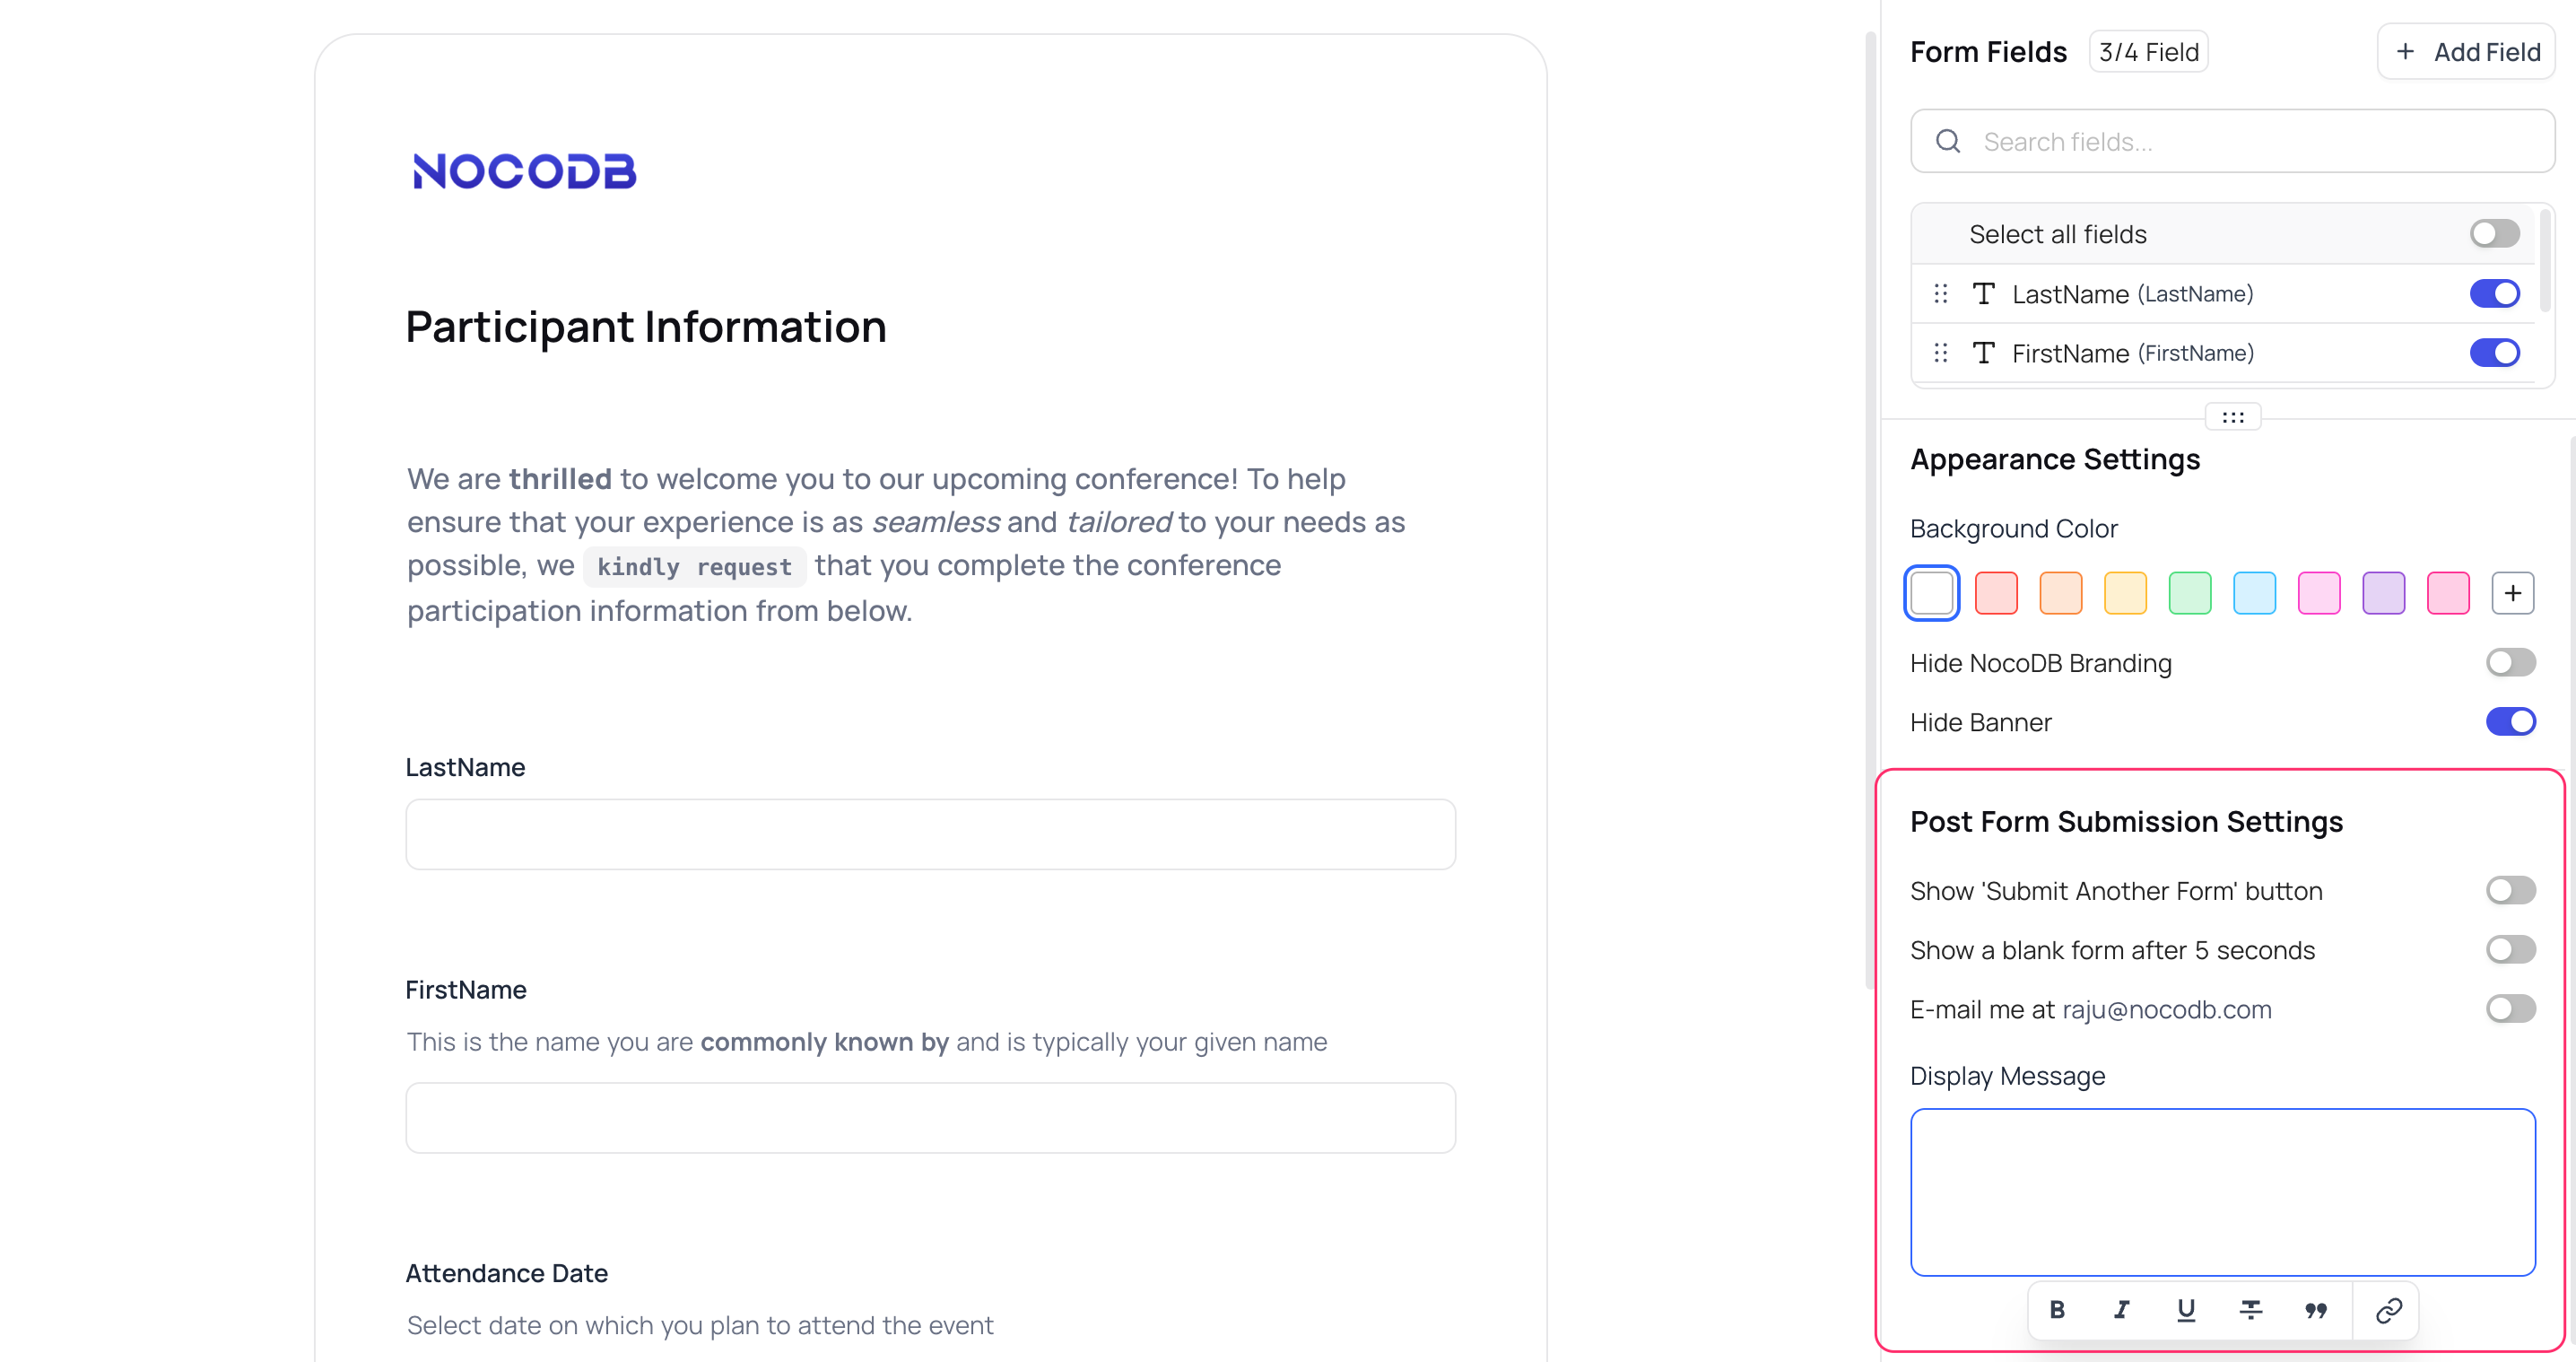
- Post Form Submission Settings - This is the area where you can configure the form view to perform various actions after a form is submitted.
Form View Actions
- Create a New Form View
- Rename an Existing Form View
- Duplicate a Form View
- Remove a Form View
- Share a Form View
- Lock Form View for Edits
Form View Operations
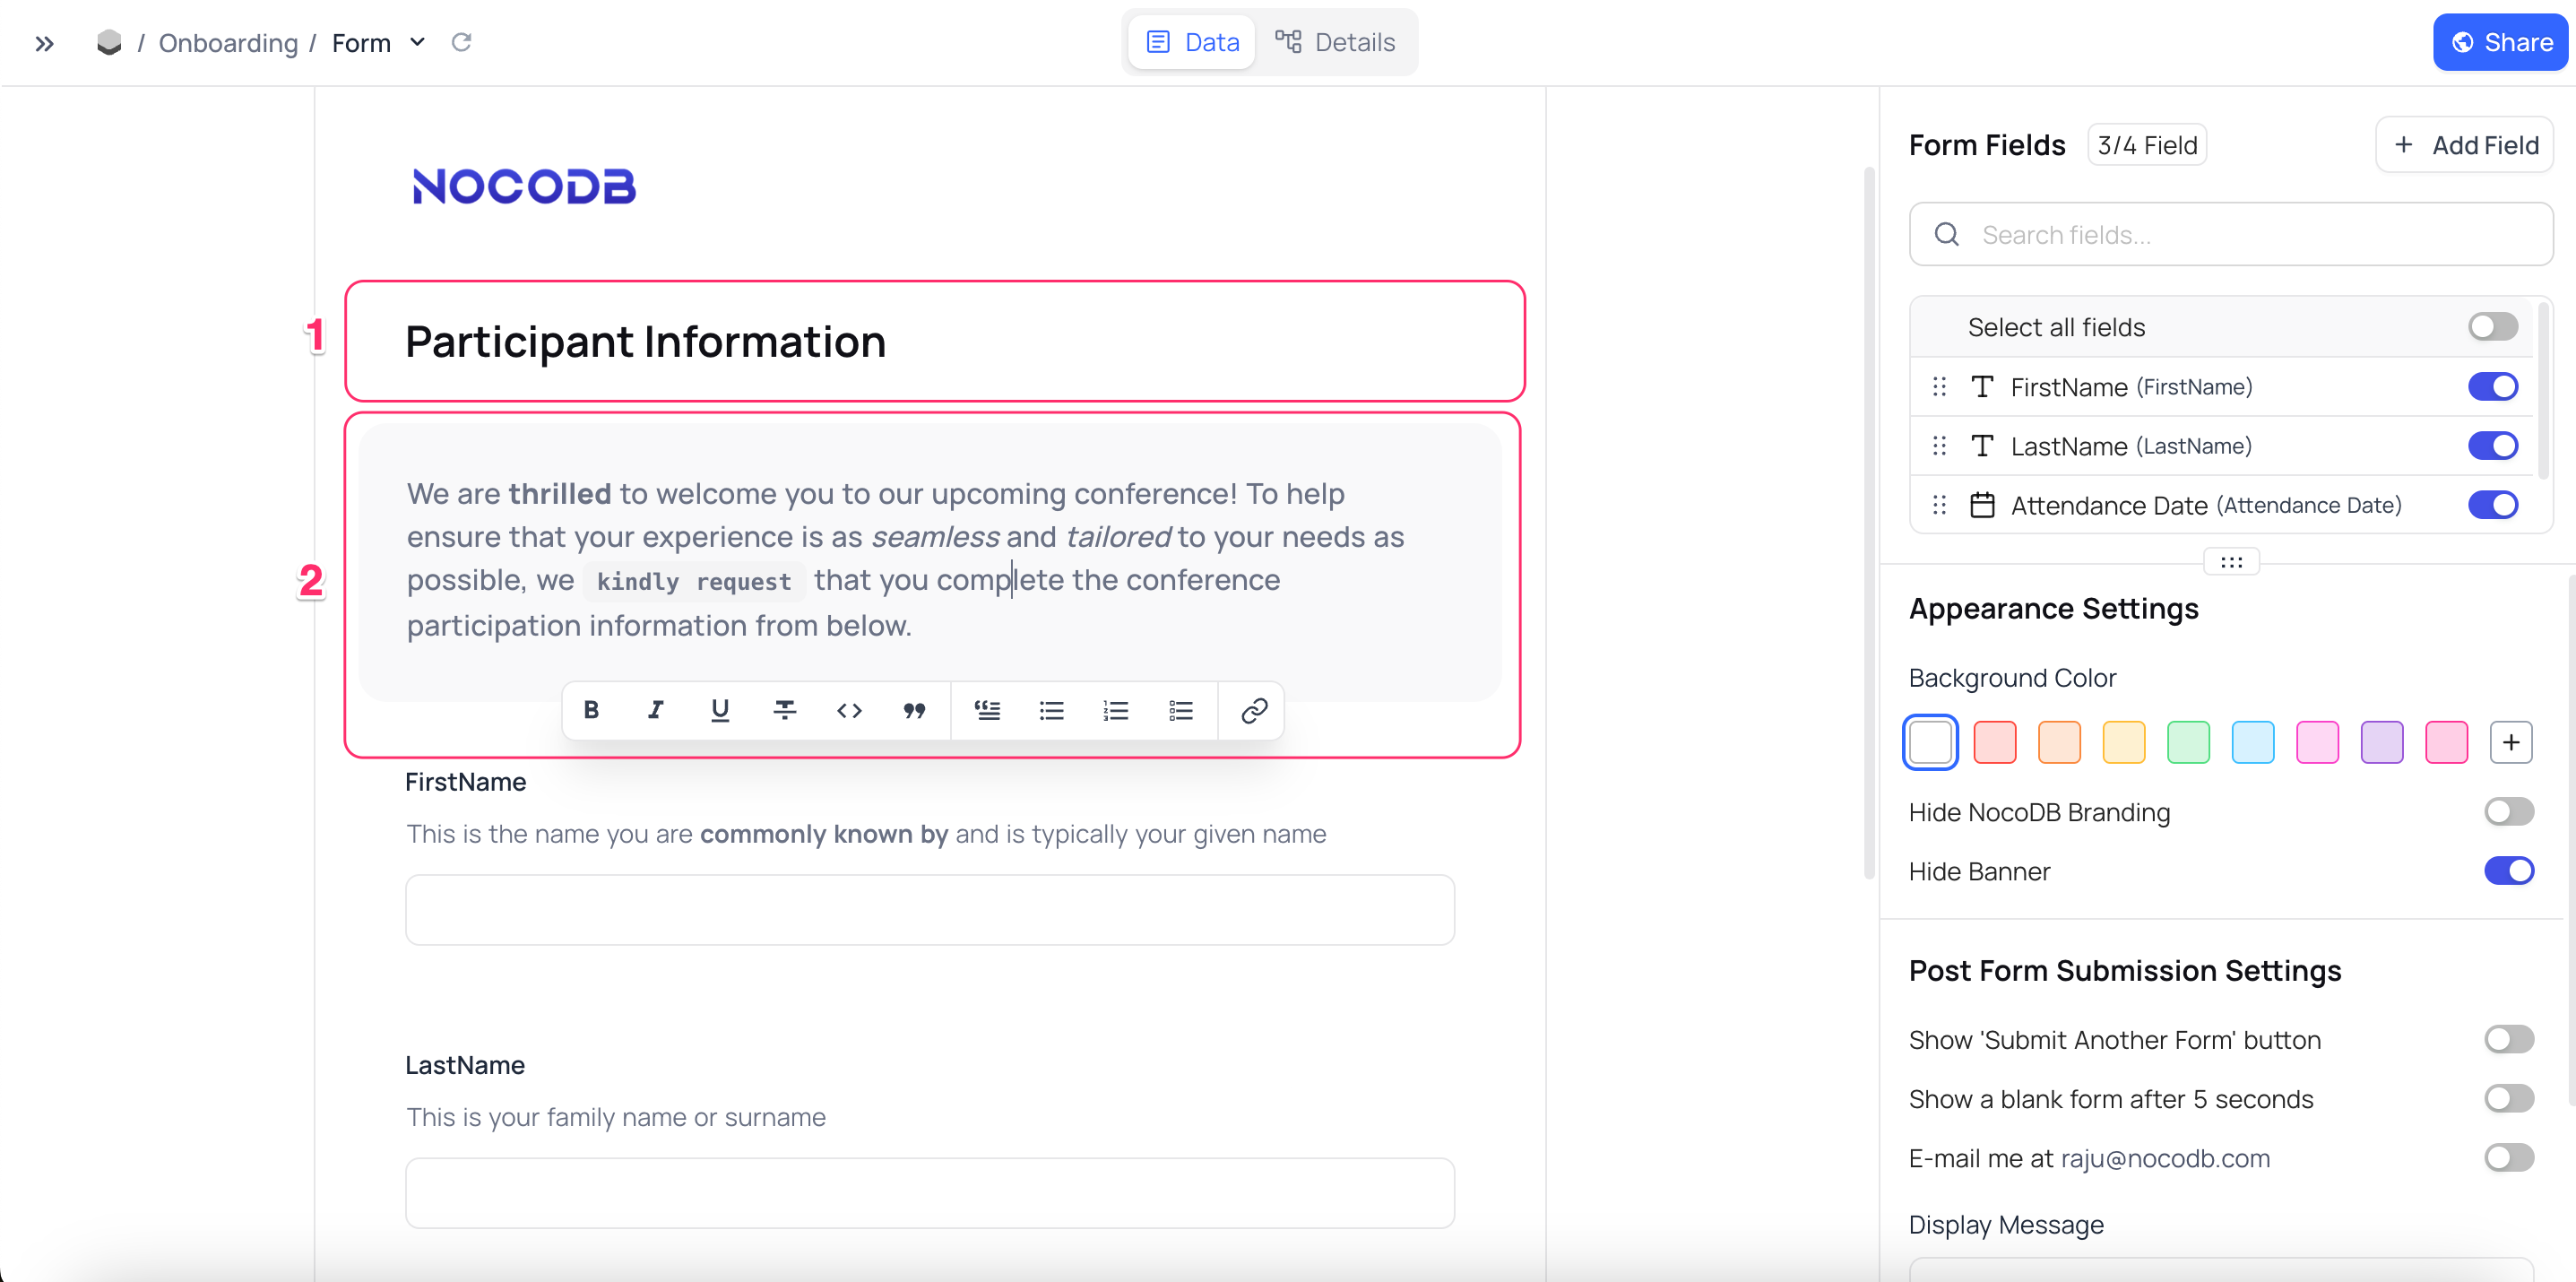
Add Form Title & Description
In the Form View area, click on in input boxes provided for Title & Description to add/update title & description to the form.
Formatting options are supported for the description field. You can also use Markdown to format the text.
Add/Remove Fields
To add/remove a field
- Use toggle switch next to the field name in the Form Fields to add/remove a field from the form.
Form Appearance Settings
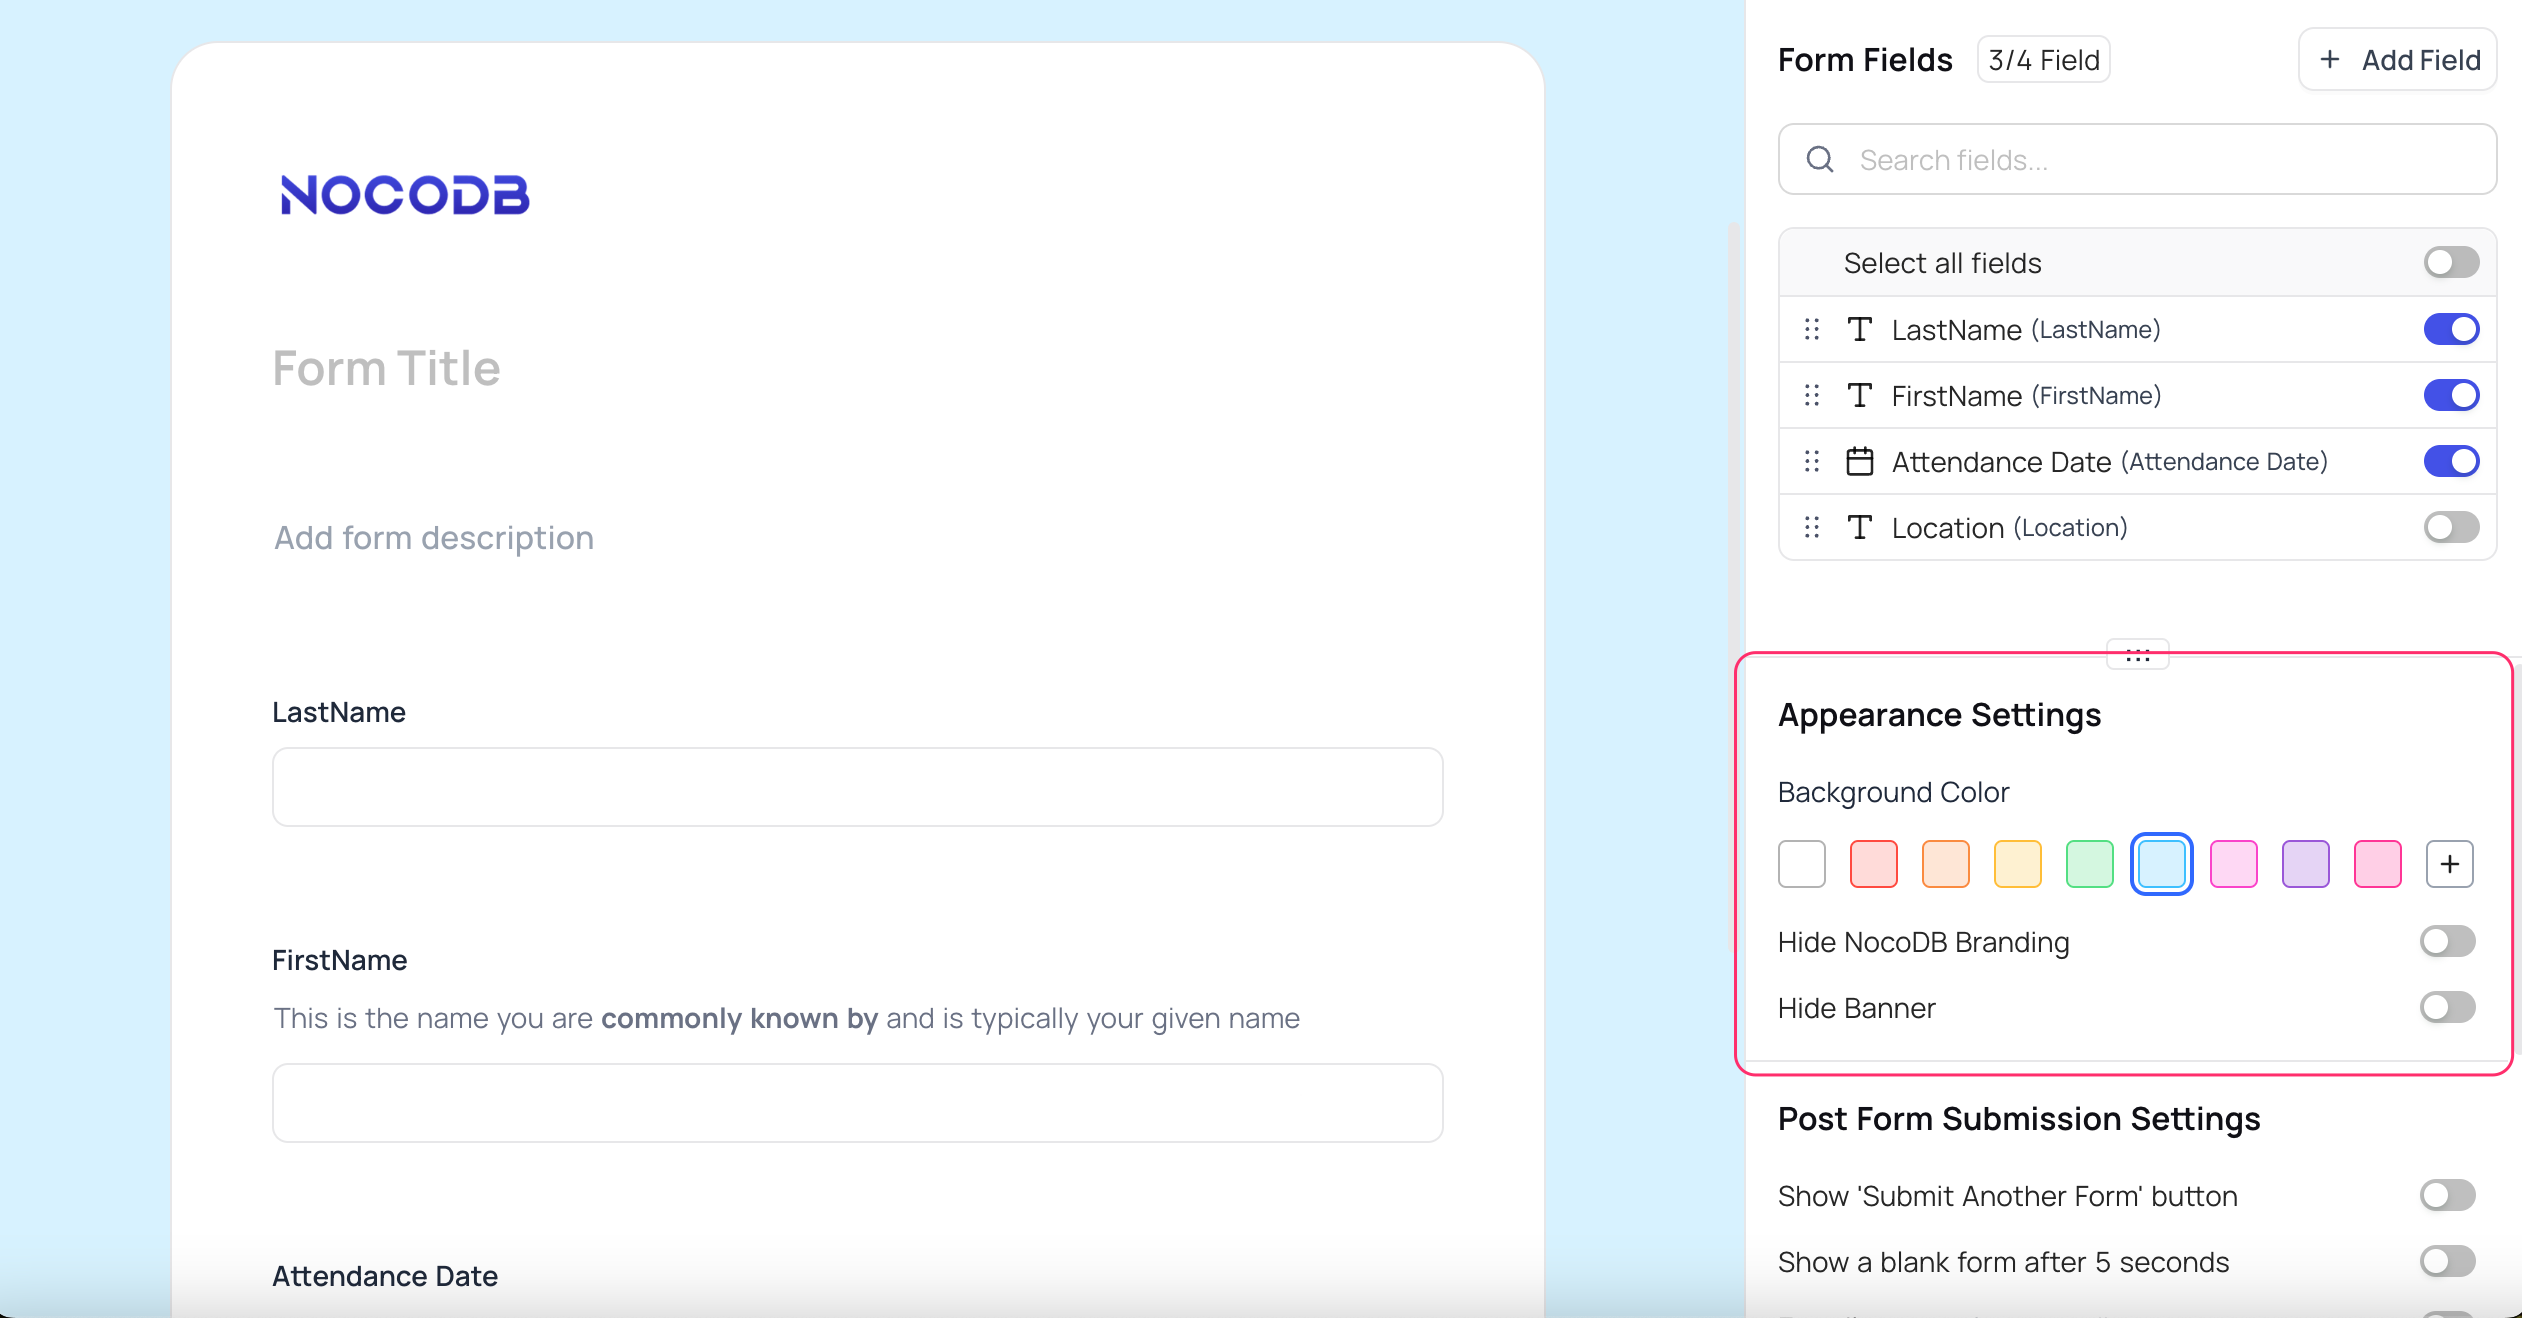
Change Background Color
To change the background color of the form, select the required color from the color picker in the Appearance Settings panel.
Hide Branding
To hide NocoDB branding from the form, toggle the Hide NocoDB Branding switch in the Appearance Settings panel.
This feature is available only in the paid plans in both Cloud & Self-hosted.
Hide Form Banner
To hide the form banner, toggle the Hide Banner switch in the Appearance Settings panel.
Rearrange Fields Within the Form
To rearrange fields within the form, drag and drop the field to the required position. This can be done in both the Form Area and Form Fields panel.
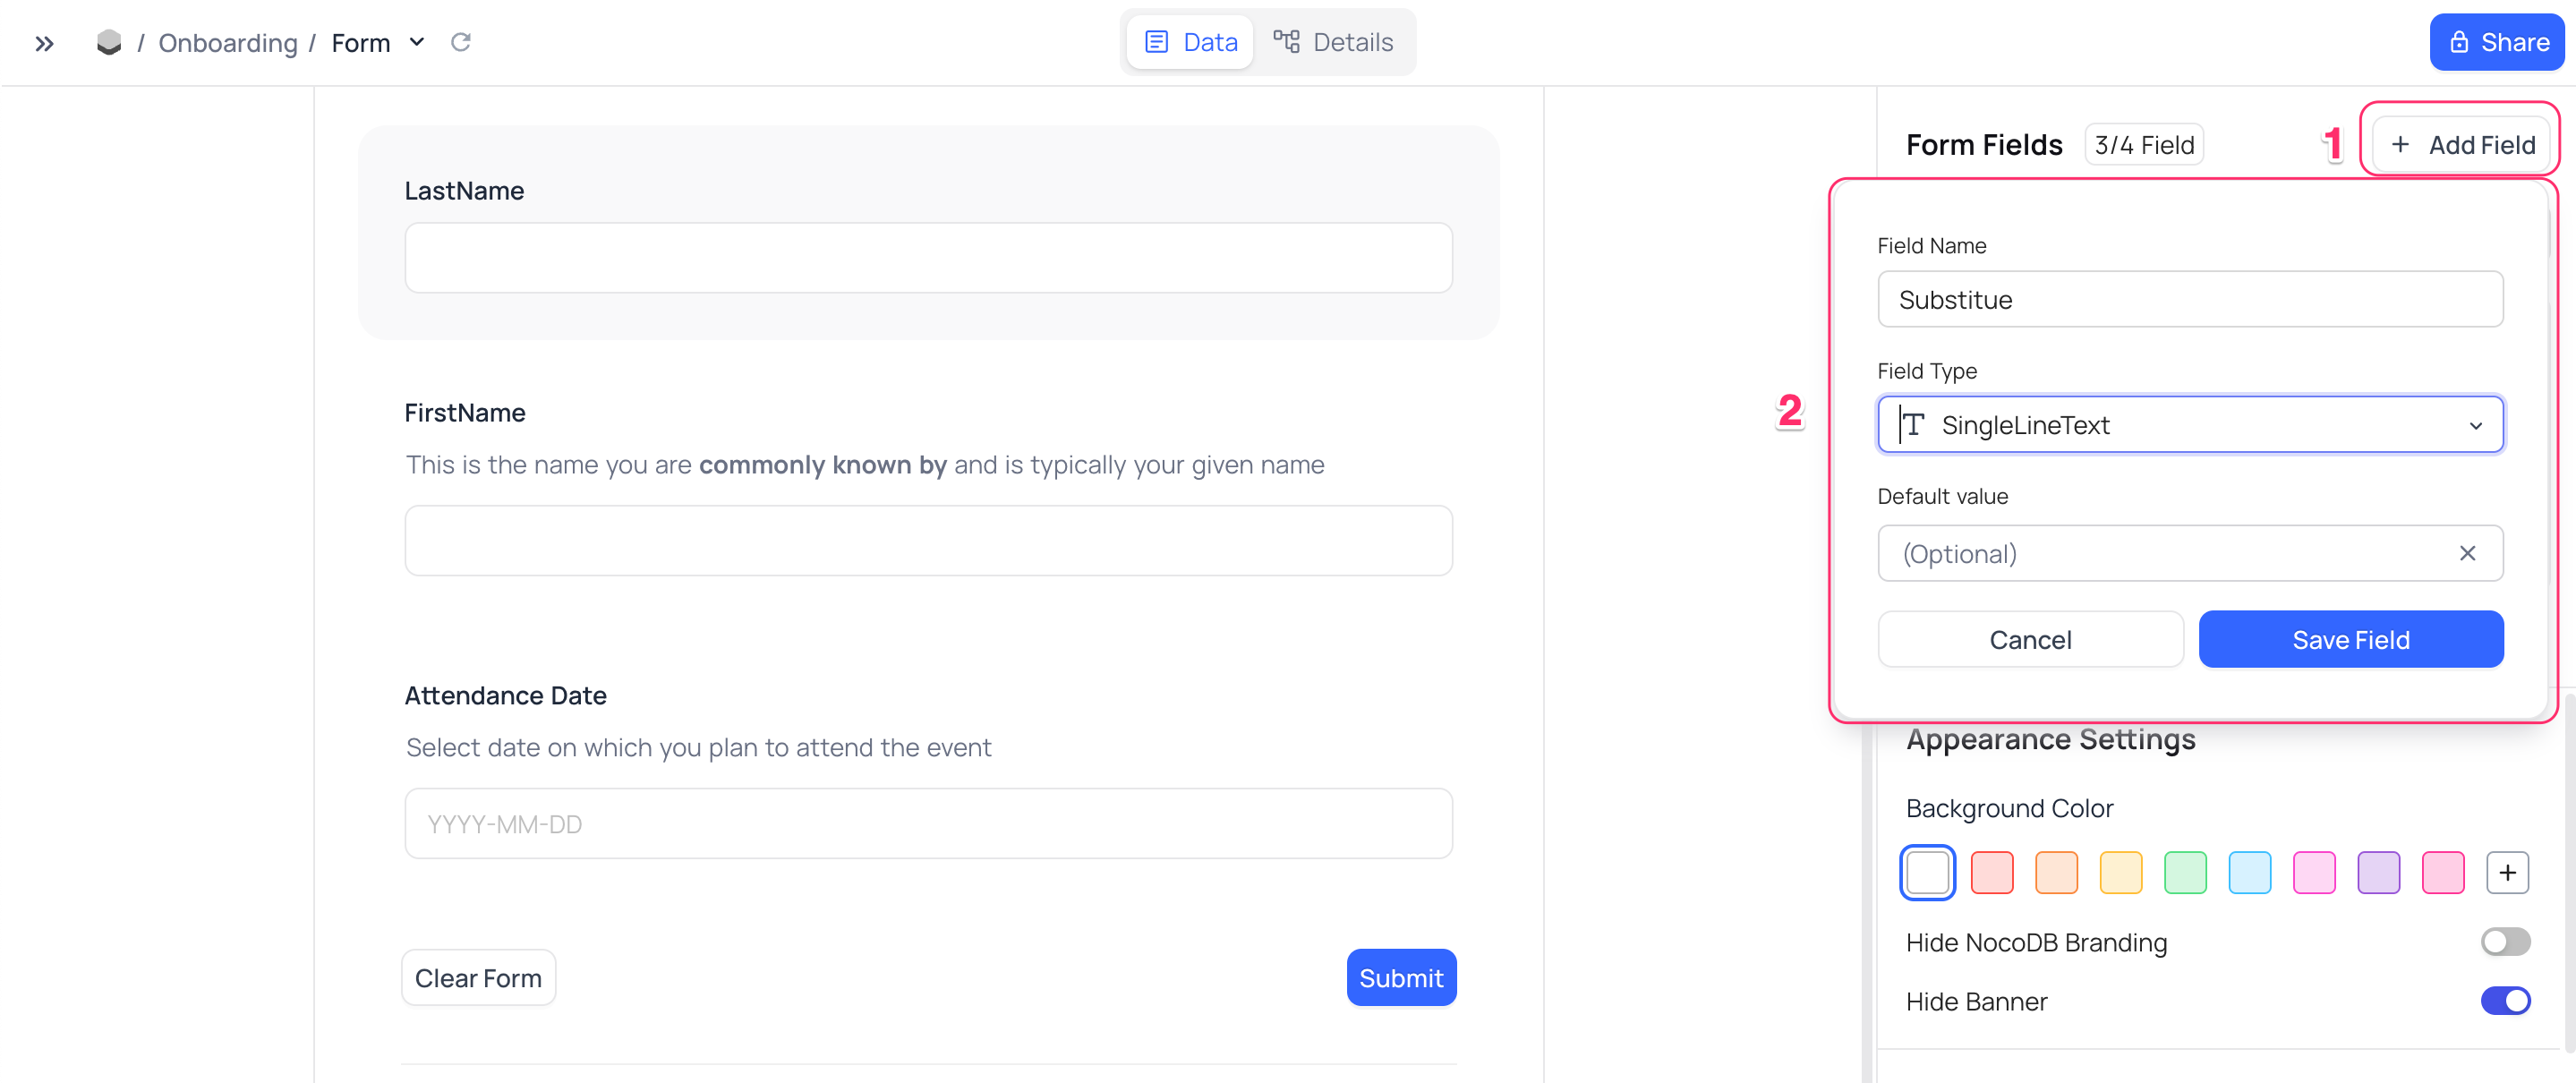
Add a New Field to the Table
To add a new field to the table,
- Click on the
+ Add fieldin the Form Fields panel - Select the field name & type from the dropdown.
- Click on
Save Field
Post Form Submission Settings
NocoDB allows you to configure the form view to perform various actions after a form is submitted. These actions can be configured in the Post Form Submission Settings panel.
- Show
Submit Another FormButton: This option when enabled, will display aSubmit Another Formbutton after the form is submitted. - Show a Blank form: This option when enabled, will display a new blank form 5 seconds after the form is submitted.
- Email me: Enable this option to receive an Email after the form is submitted.
- After Submit Message: You can configure a message to display on successful submission of the form.
Formatting options are supported for the After Submit Message field. You can also use Markdown to format the text.
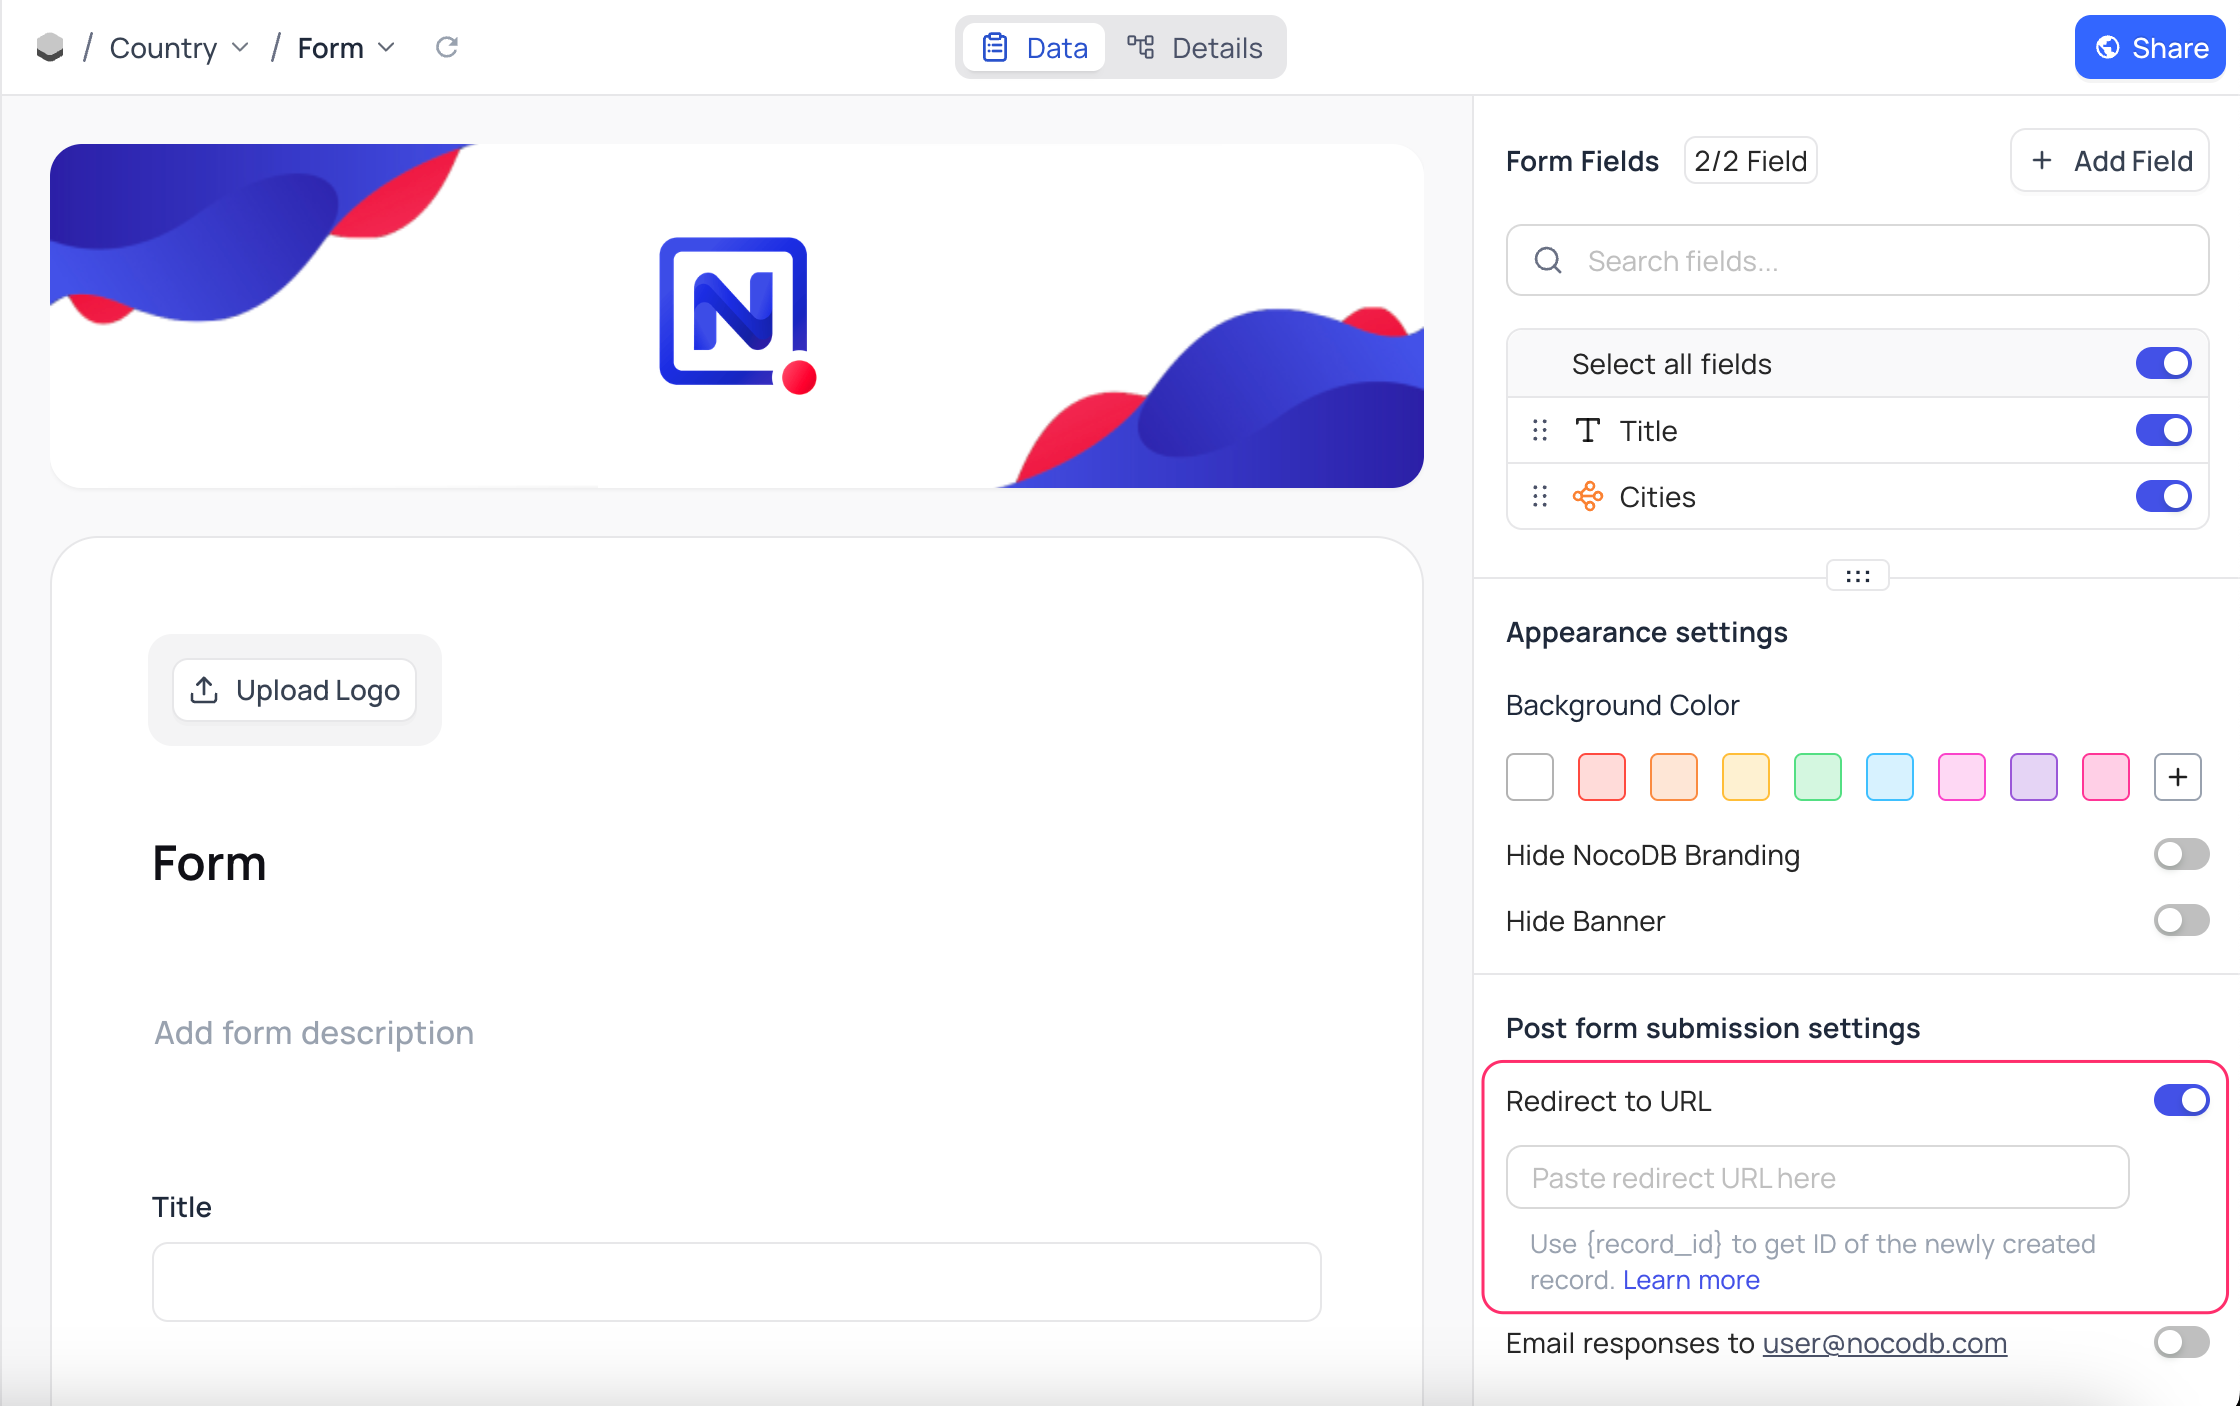
Redirect URL
To redirect the user to a specific URL after the form is submitted, toggle the Redirect URL switch in the Post Form Submission Settings panel and enter the URL in the input box provided. The browser will redirect to the specified URL after the form is submitted instead of showing the default success message & "Submit Another Form" button.
You can use {record_id} in the URL as a query parameter to display the newly created record as expanded form (provided user submitting form has access to the base). For example, https://app.nocodb.com/#/<workspaceId>/<baseId>/<tableId>?rowId={record_id}
You can also use {record_id} in the URL as query parameter to pass the record ID of the newly created record to link in subsequent form. For example, if you want a link field in another table to be populated based on the record just created, you can use the shared form URL with link field prefilled appropriately https://<shared form URL>?<link field>={record_id}
Use of Redirect URL is mutually exclusive with the After Submit missage, Show a Blank form and Submit Another Form options. If Redirect URL is enabled, the form will redirect to the specified URL after submission.
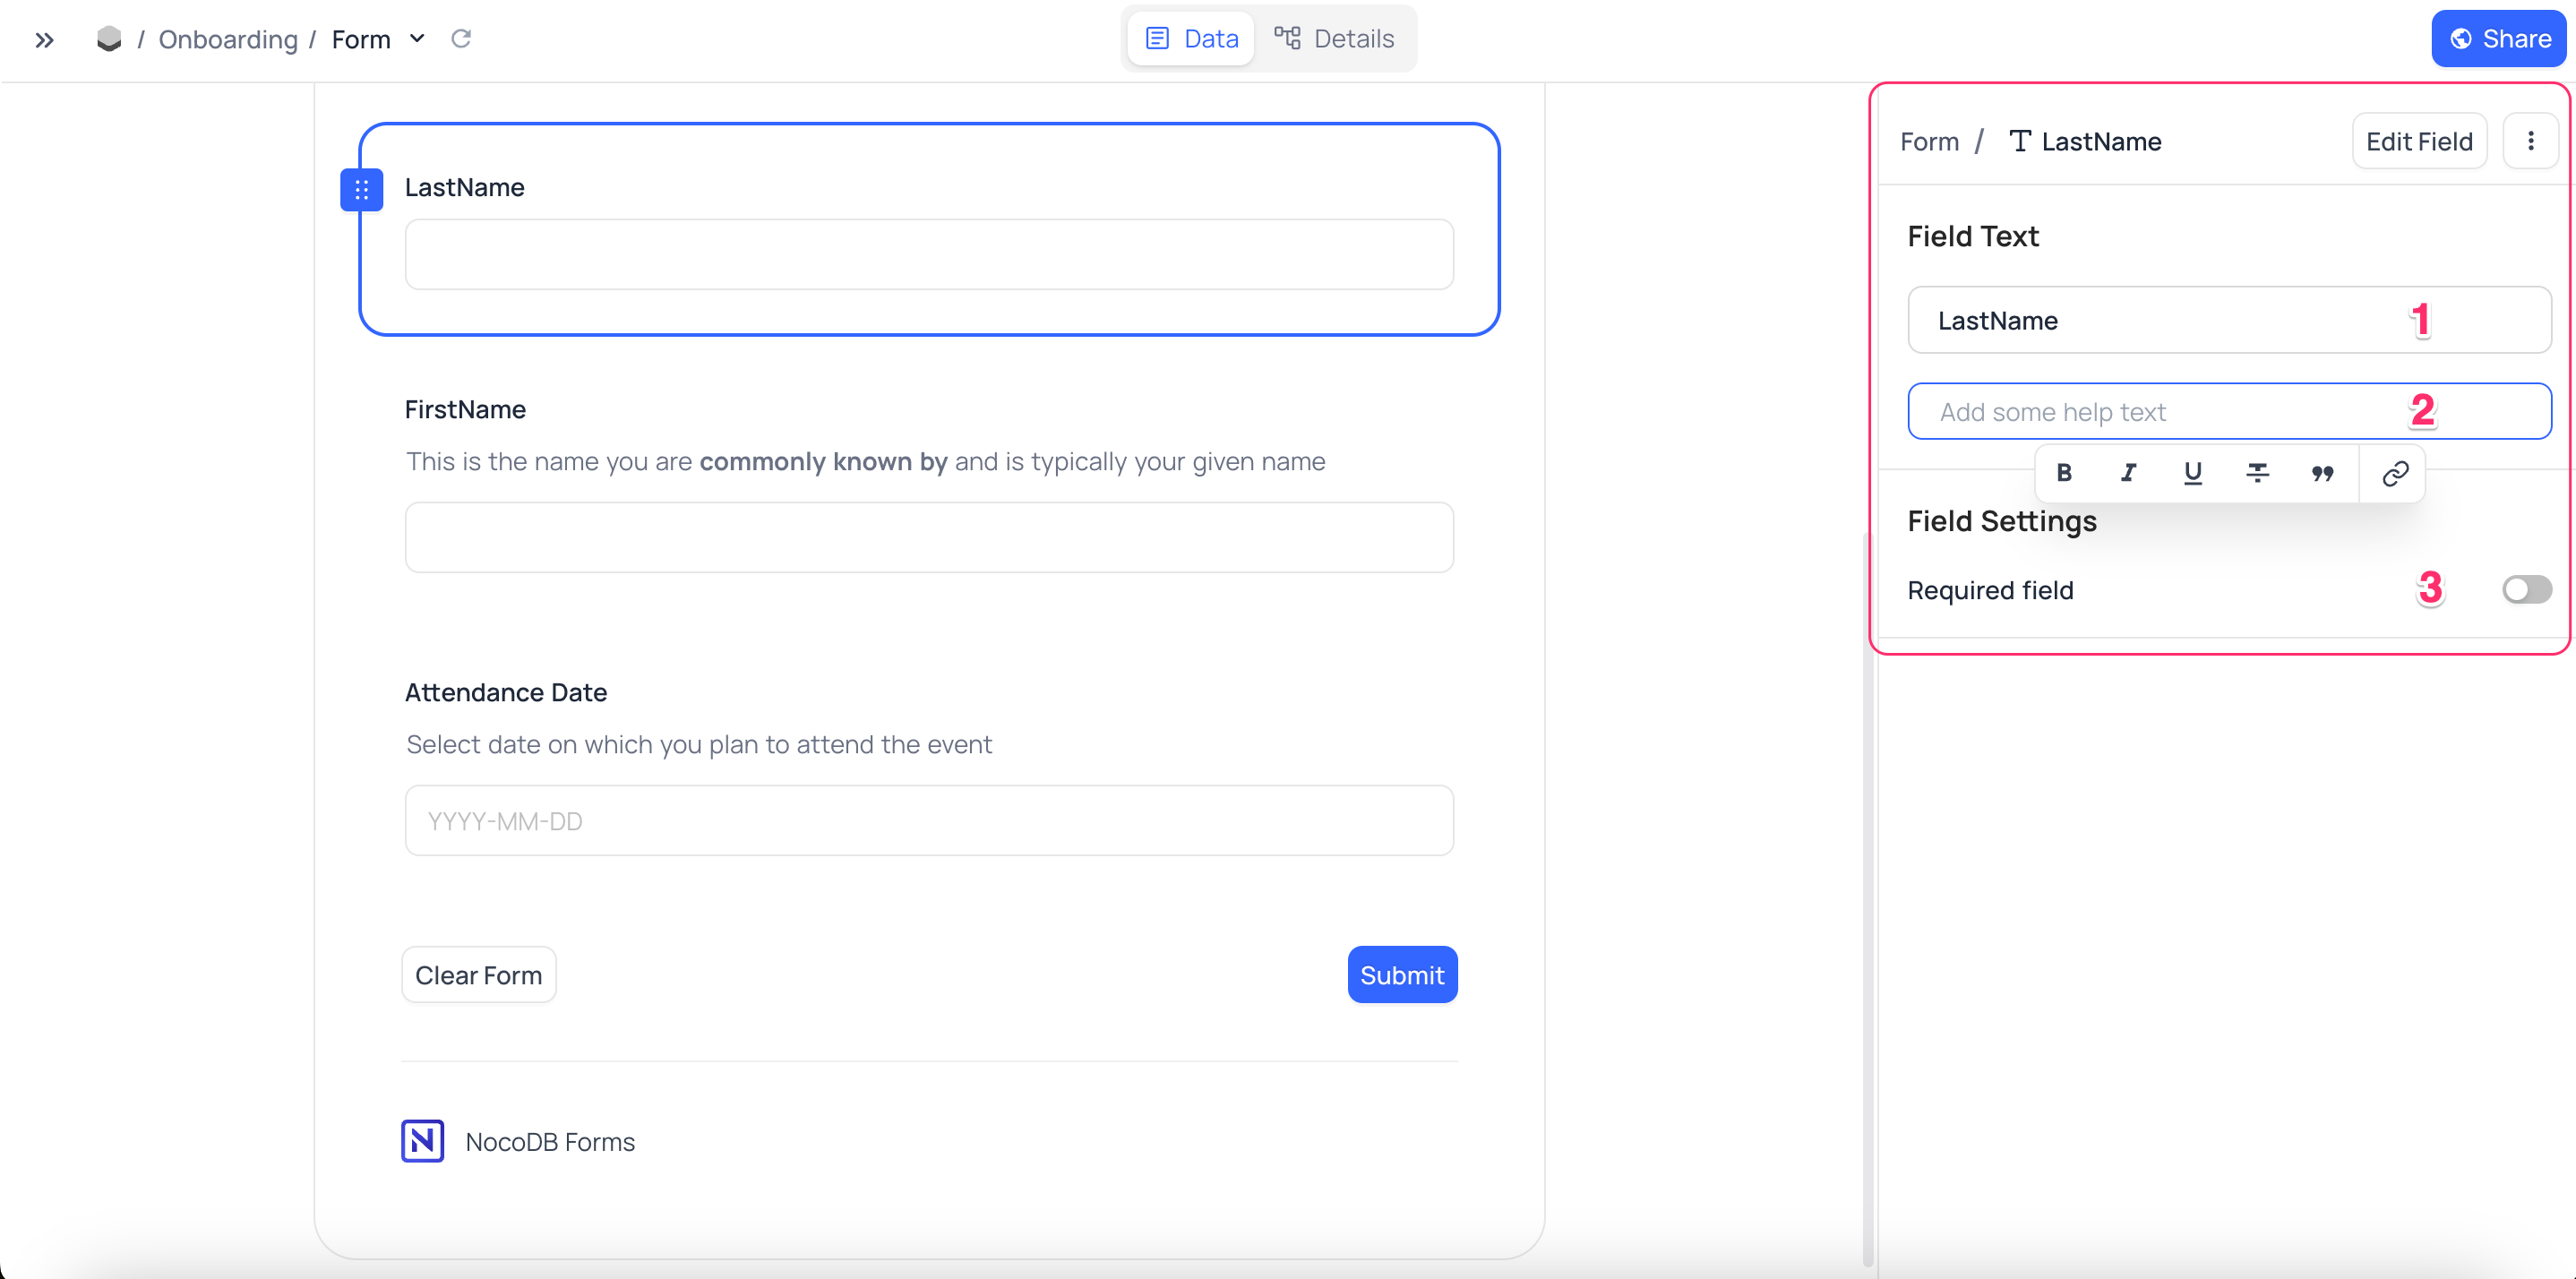
Field configuration
To change the field label displayed on the form & add help-text, click on the required field in the Form Area and on the right side configuration panel, configure
- Label
Optional: Defaults to the field name. This doesn't affect the field name in the table. - Help Text
Optional - Required : Toggle to mark the field as required
- Required fields are marked with a red asterisk (*) in the form.
- If Checkbox field is marked as required, it has to be checked to submit the form.
Formatting options are supported for the Help Text field. You can also use Markdown to format the text.
Select Field Type
Options Layout
For select based field types, you can configure the options layout to be displayed as a Dropdown or an inline expanded List.
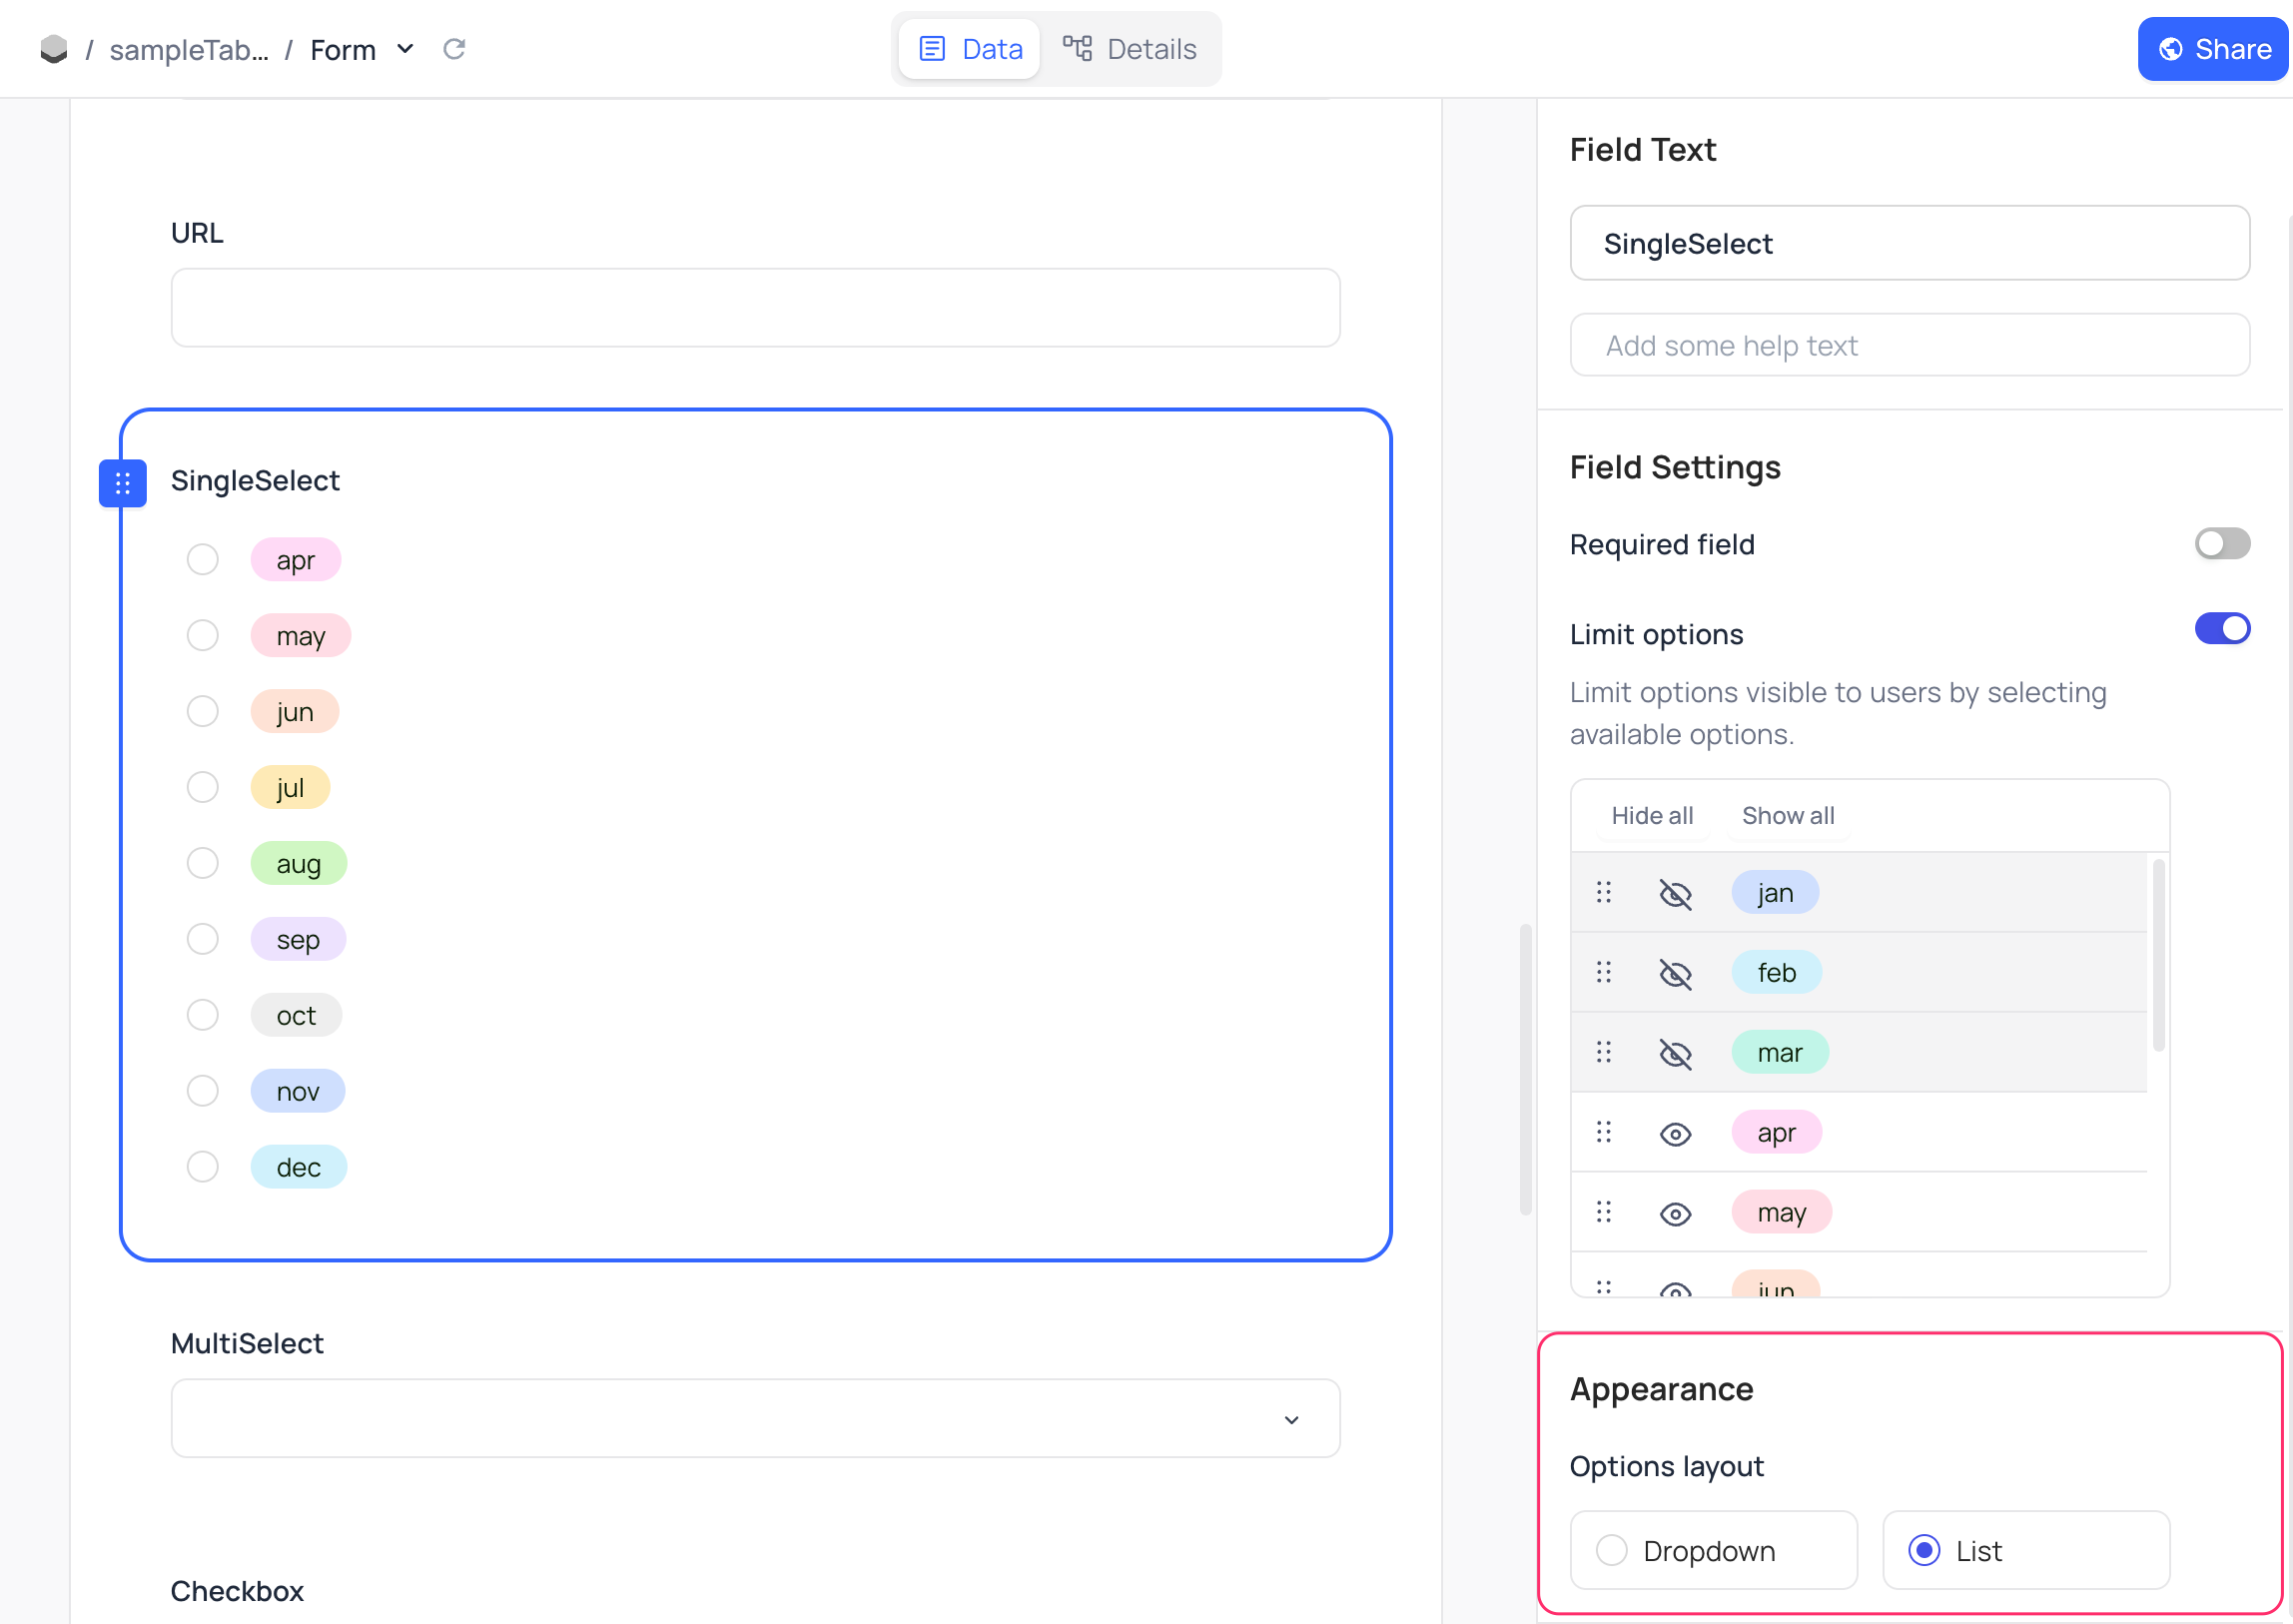
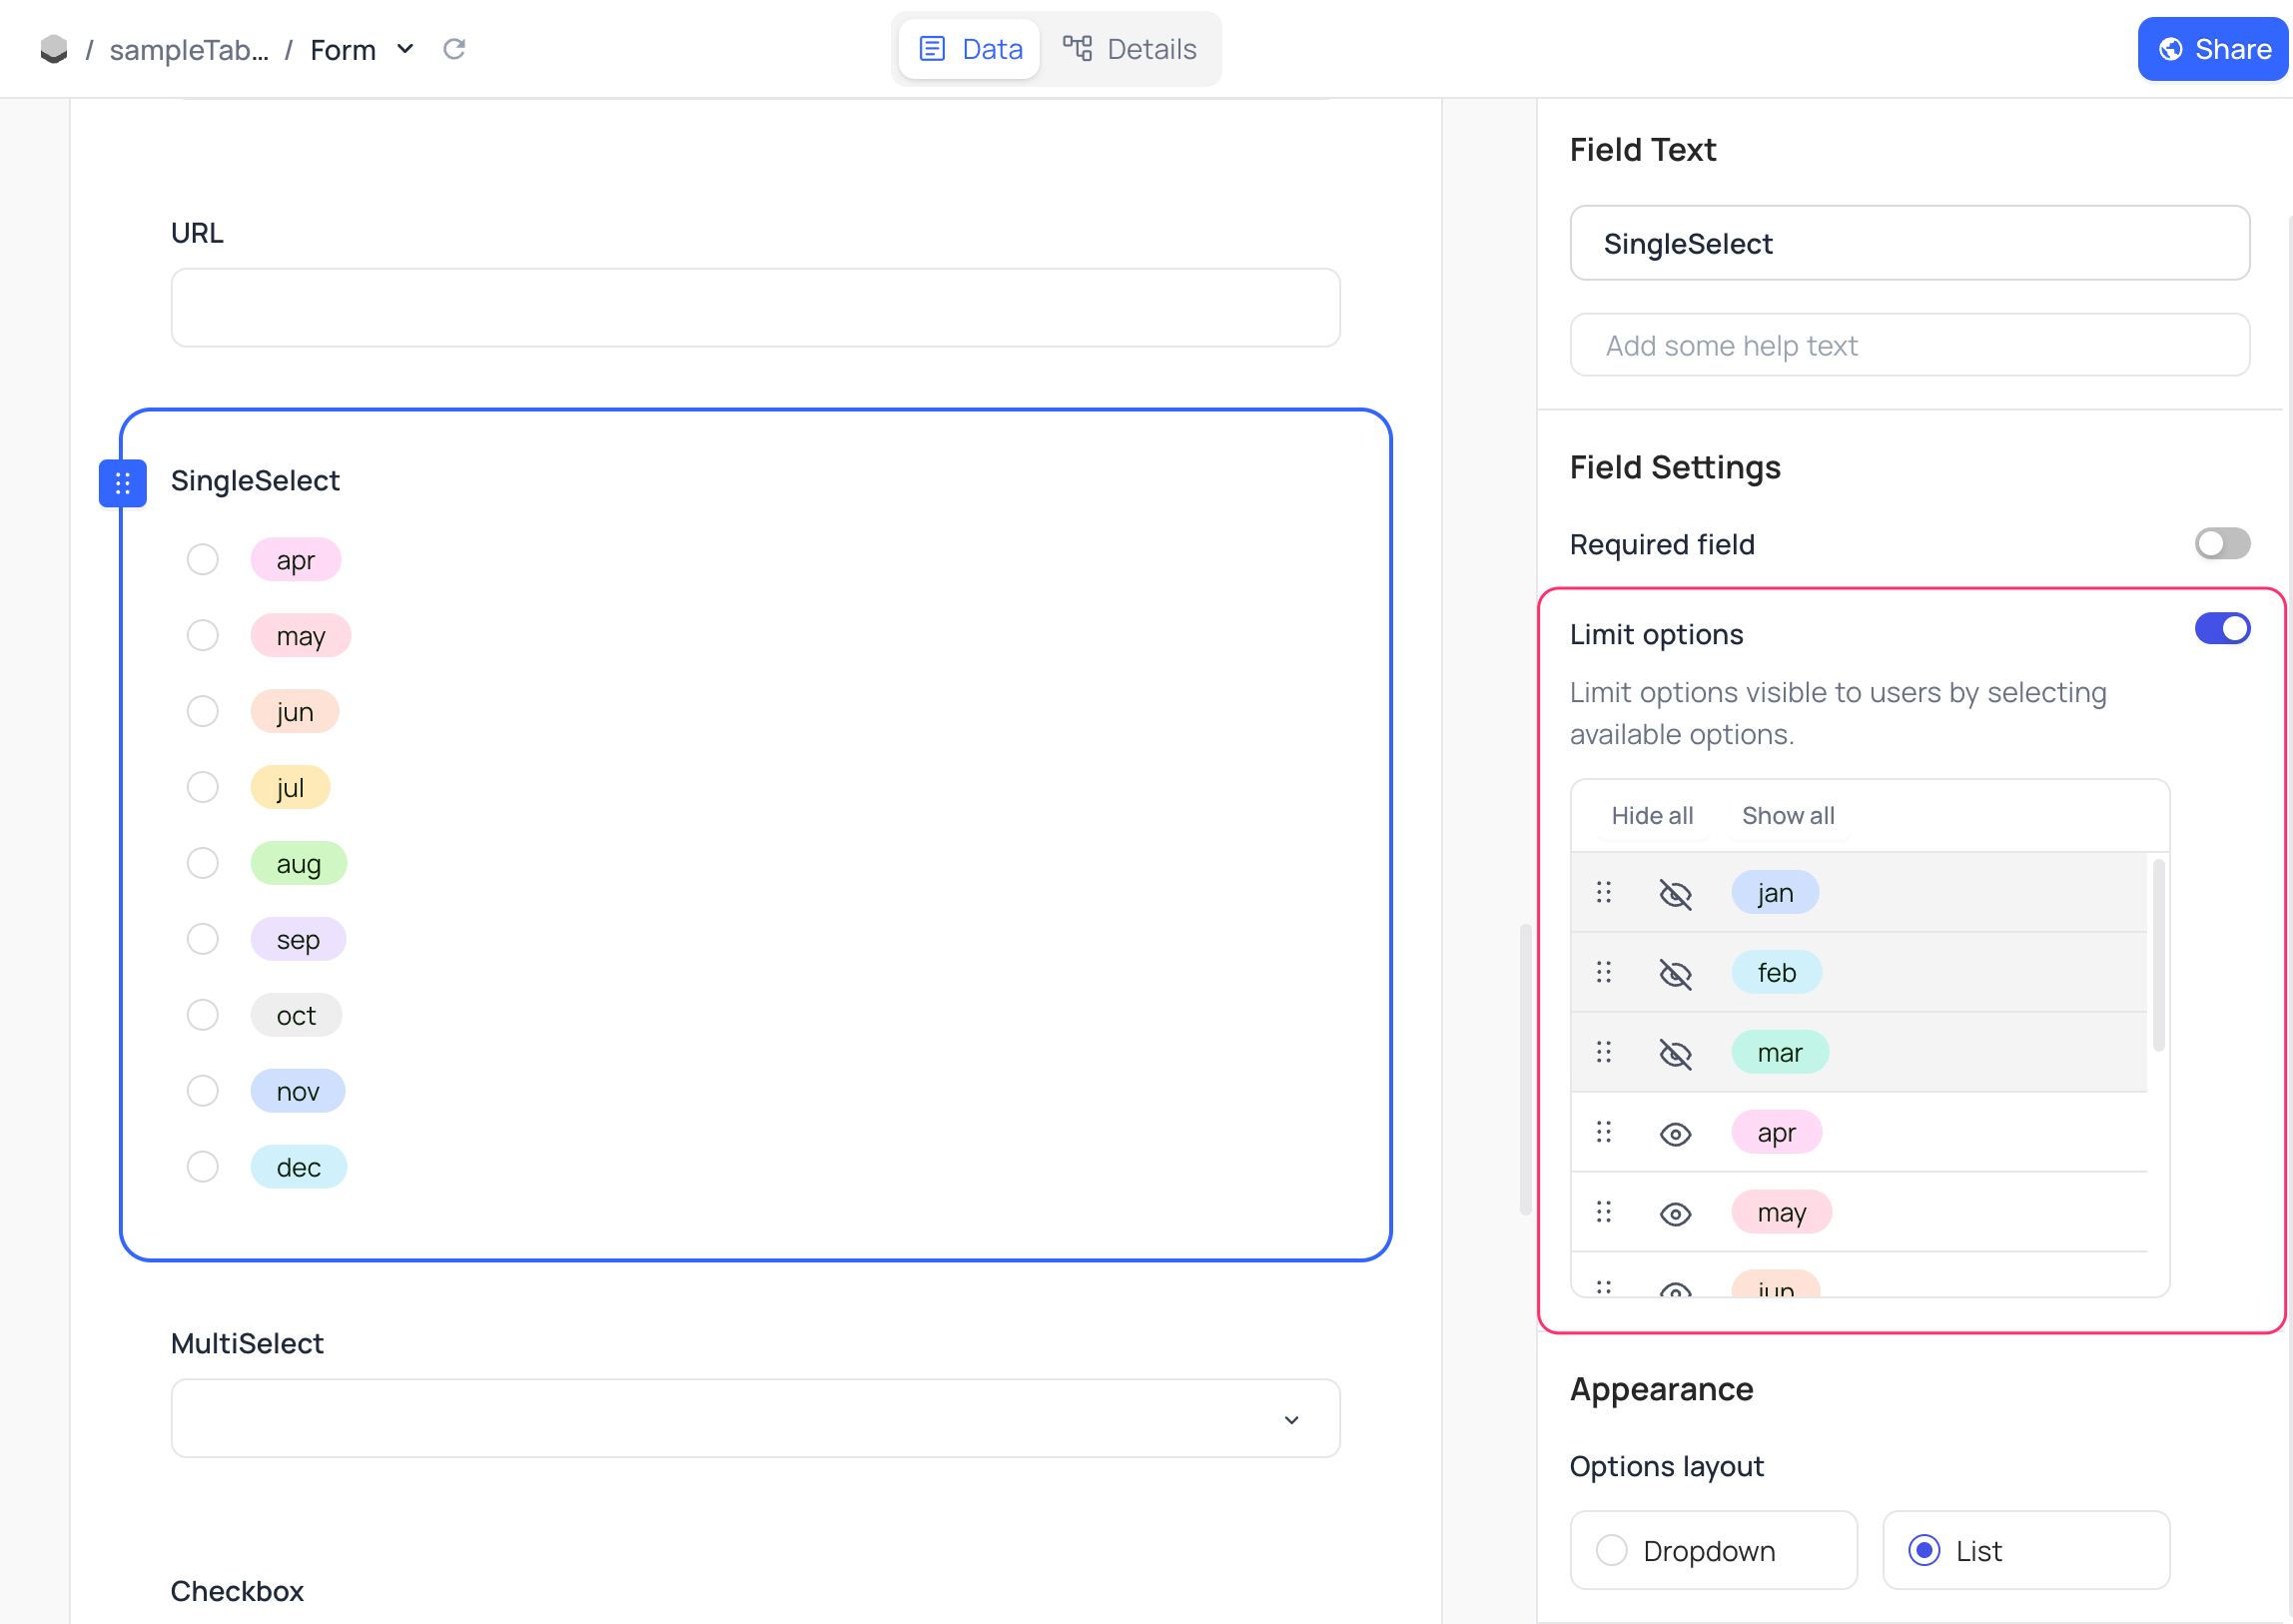
Limit Options
Limit the number of options displayed in the dropdown or list. This is useful when dealing with a large number of options, allowing you to restrict the visible choices for the user.
- Use
Hidebutton next to the option to hide the option from the dropdown or list. - Use
Reorderbutton associated with a field to reorder the options.
Field Validations ☁
Field validations are only available in the cloud version of NocoDB.
NocoDB allows you to configure input data validations for fields in the form. To configure field validation, click on the required field in the Form Area, and in the right configuration panel, configure the desired validations. Supported validations are type-specific and are listed below.
- Validation rules for fields are only applied when input fields are not empty. Set Required field to enforce these validation rules and ensure that the field cannot be left blank.
- The form cannot be submitted if the validation rules are not met.
Text-based Field Types
For text-based field types Single Line Text Email Phone number URL Long Text Rich Text, you can configure the following validations:
- Minimum characters: Specifies the minimum number of characters required for the field.
- Maximum characters: Specifies the maximum number of characters allowed for the field.
- Starts with: Allows you to define a prefix that the field value must start with.
- Ends with: Allows you to define a suffix that the field value must end with.
- Contains string: Allows you to define a substring that the field value must contain.
- Does not contain string: Allows you to define a substring that the field value must not contain.
- Regular Expression: Allows you to define a regular expression pattern that the field value must match.
For Email field type, you can configure the following additional validations:
- Validate email: Ensures that the field value is a valid email address.
- Accept only work email: Ensures that the field value is a valid work email address.
For Phone number field type, you can configure the following additional validations:
- Validate phone number: Ensures that the field value is a valid phone number.
For URL field type, you can configure the following additional validations:
- Validate URL: Ensures that the field value is a valid URL.
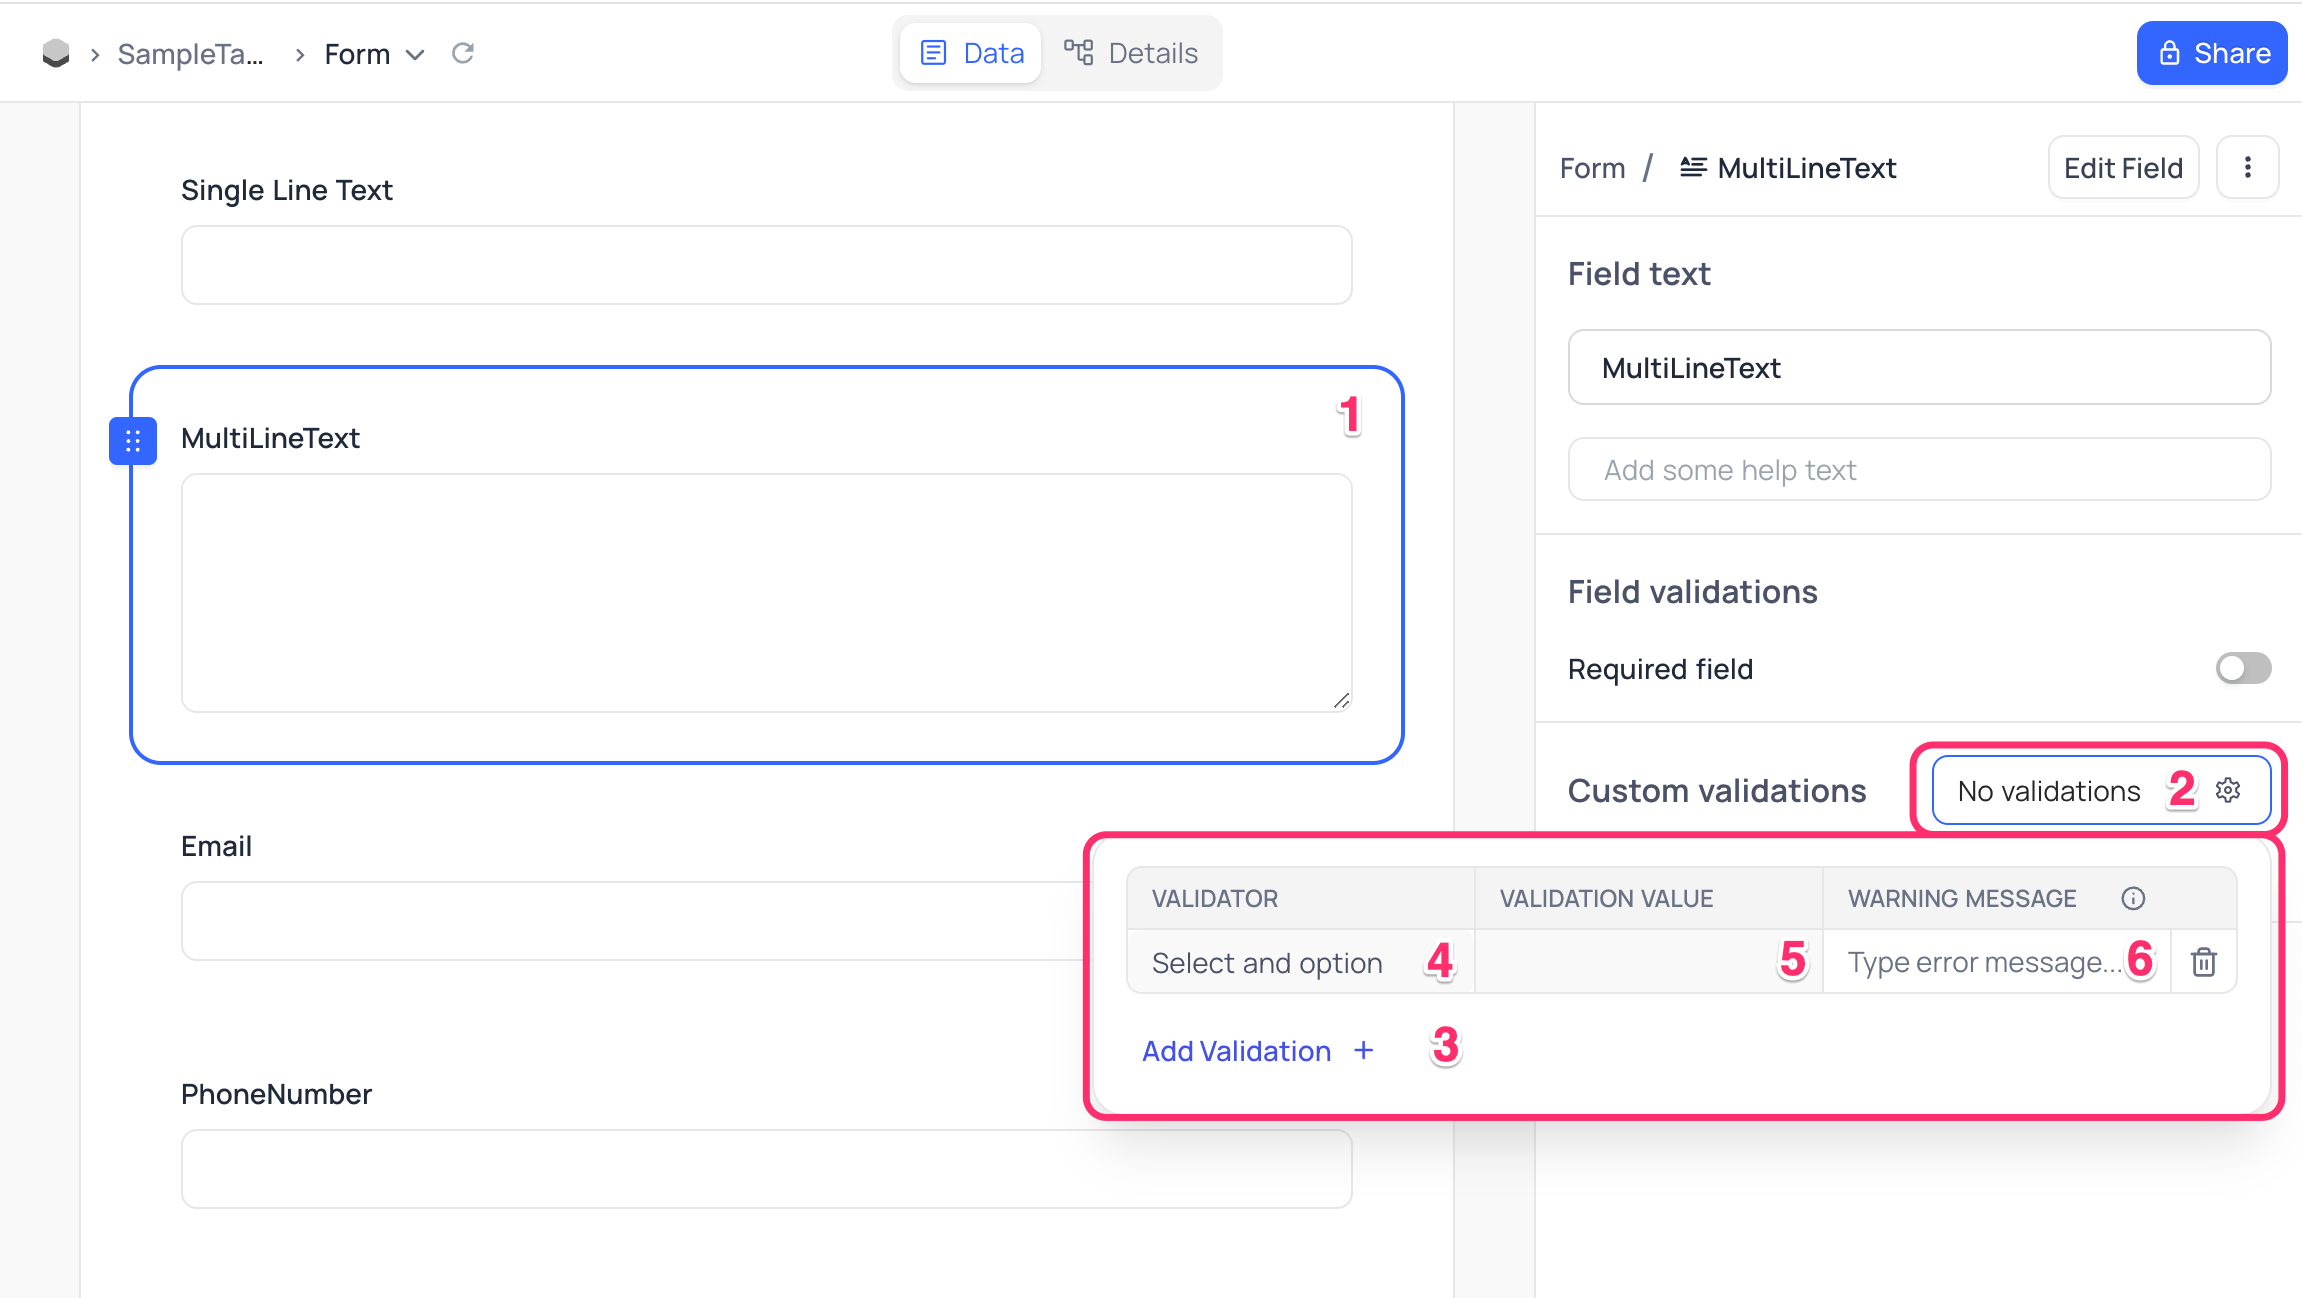
Configuration Steps
- Click on the required field in the Form Area.
- In the right configuration panel, click on the Settings icon next to
Custom Validations - Click on
Add Validationto add a new validation rule. VALIDATORSelect the type of validation rule to be applied from the dropdown.VALIDATION VALUEEnter the value for the validation rule.WARNING MESSAGE(Optional) Enter a warning message to be displayed when the validation rule is not met.
Numeric Field Types
For numeric field types Number Currency Percentage Decimal Duration, you can configure the following validations:
- Minimum: Specifies the minimum numeric value allowed for the field.
- Maximum: Specifies the maximum numeric value allowed for the field.
- Value configured can be an integer or a decimal number, positive or negative.
- Maximum value should be greater than or equal to the minimum value.
- Value can be left empty to disable the validation.
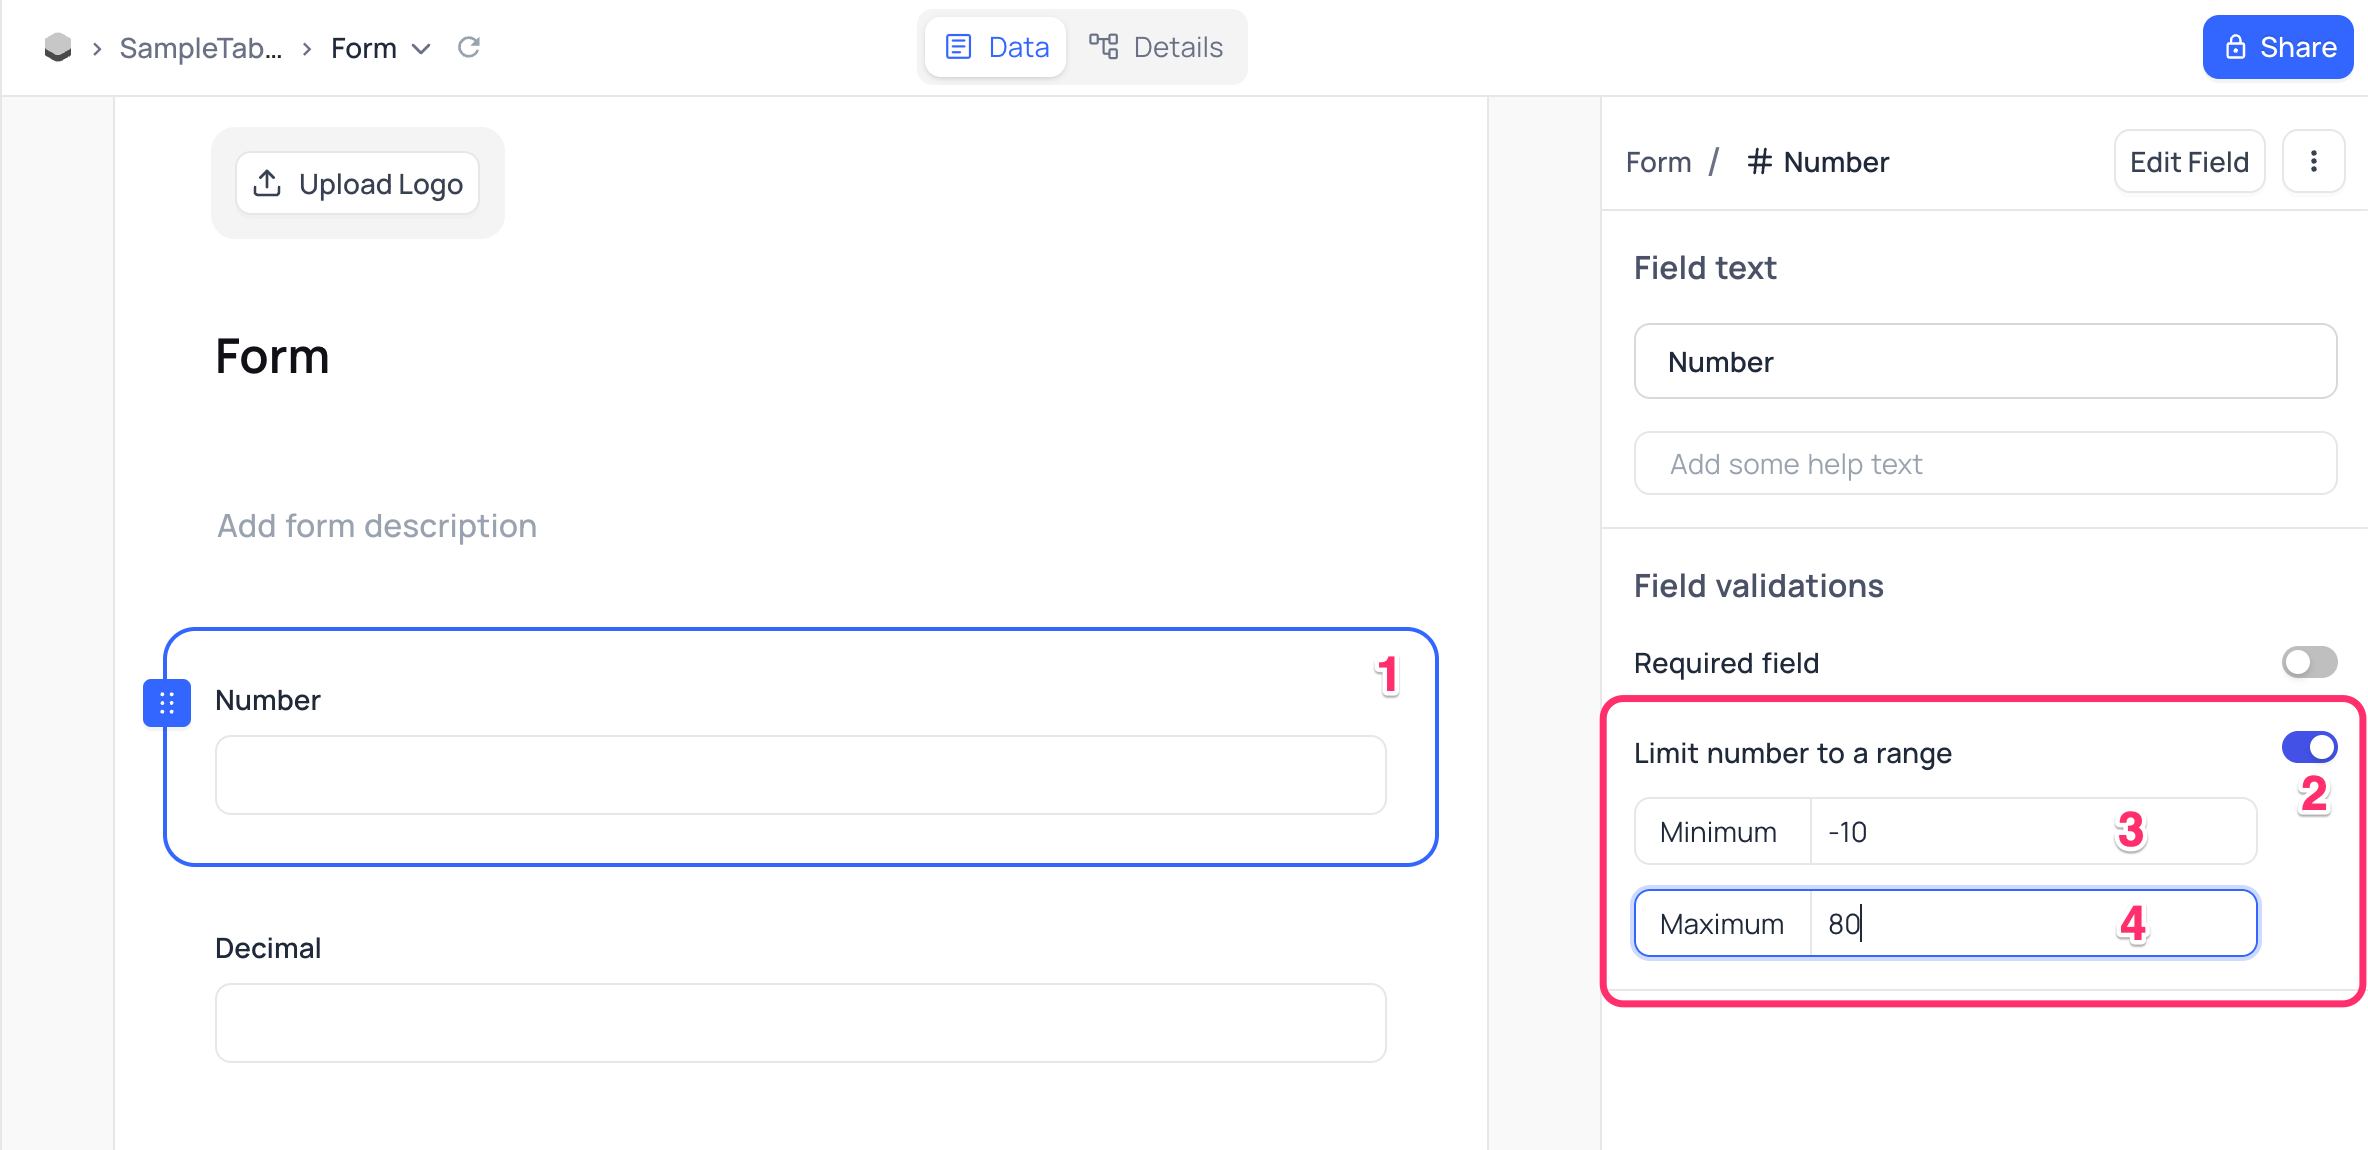
Configuration Steps
- Click on the required field in the Form Area.
- In the right configuration panel, click on the toggle button next to
Limit number to a range - [Optional] Configure the minimum value allowed for the field.
- [Optional] Configure the maximum value allowed for the field.
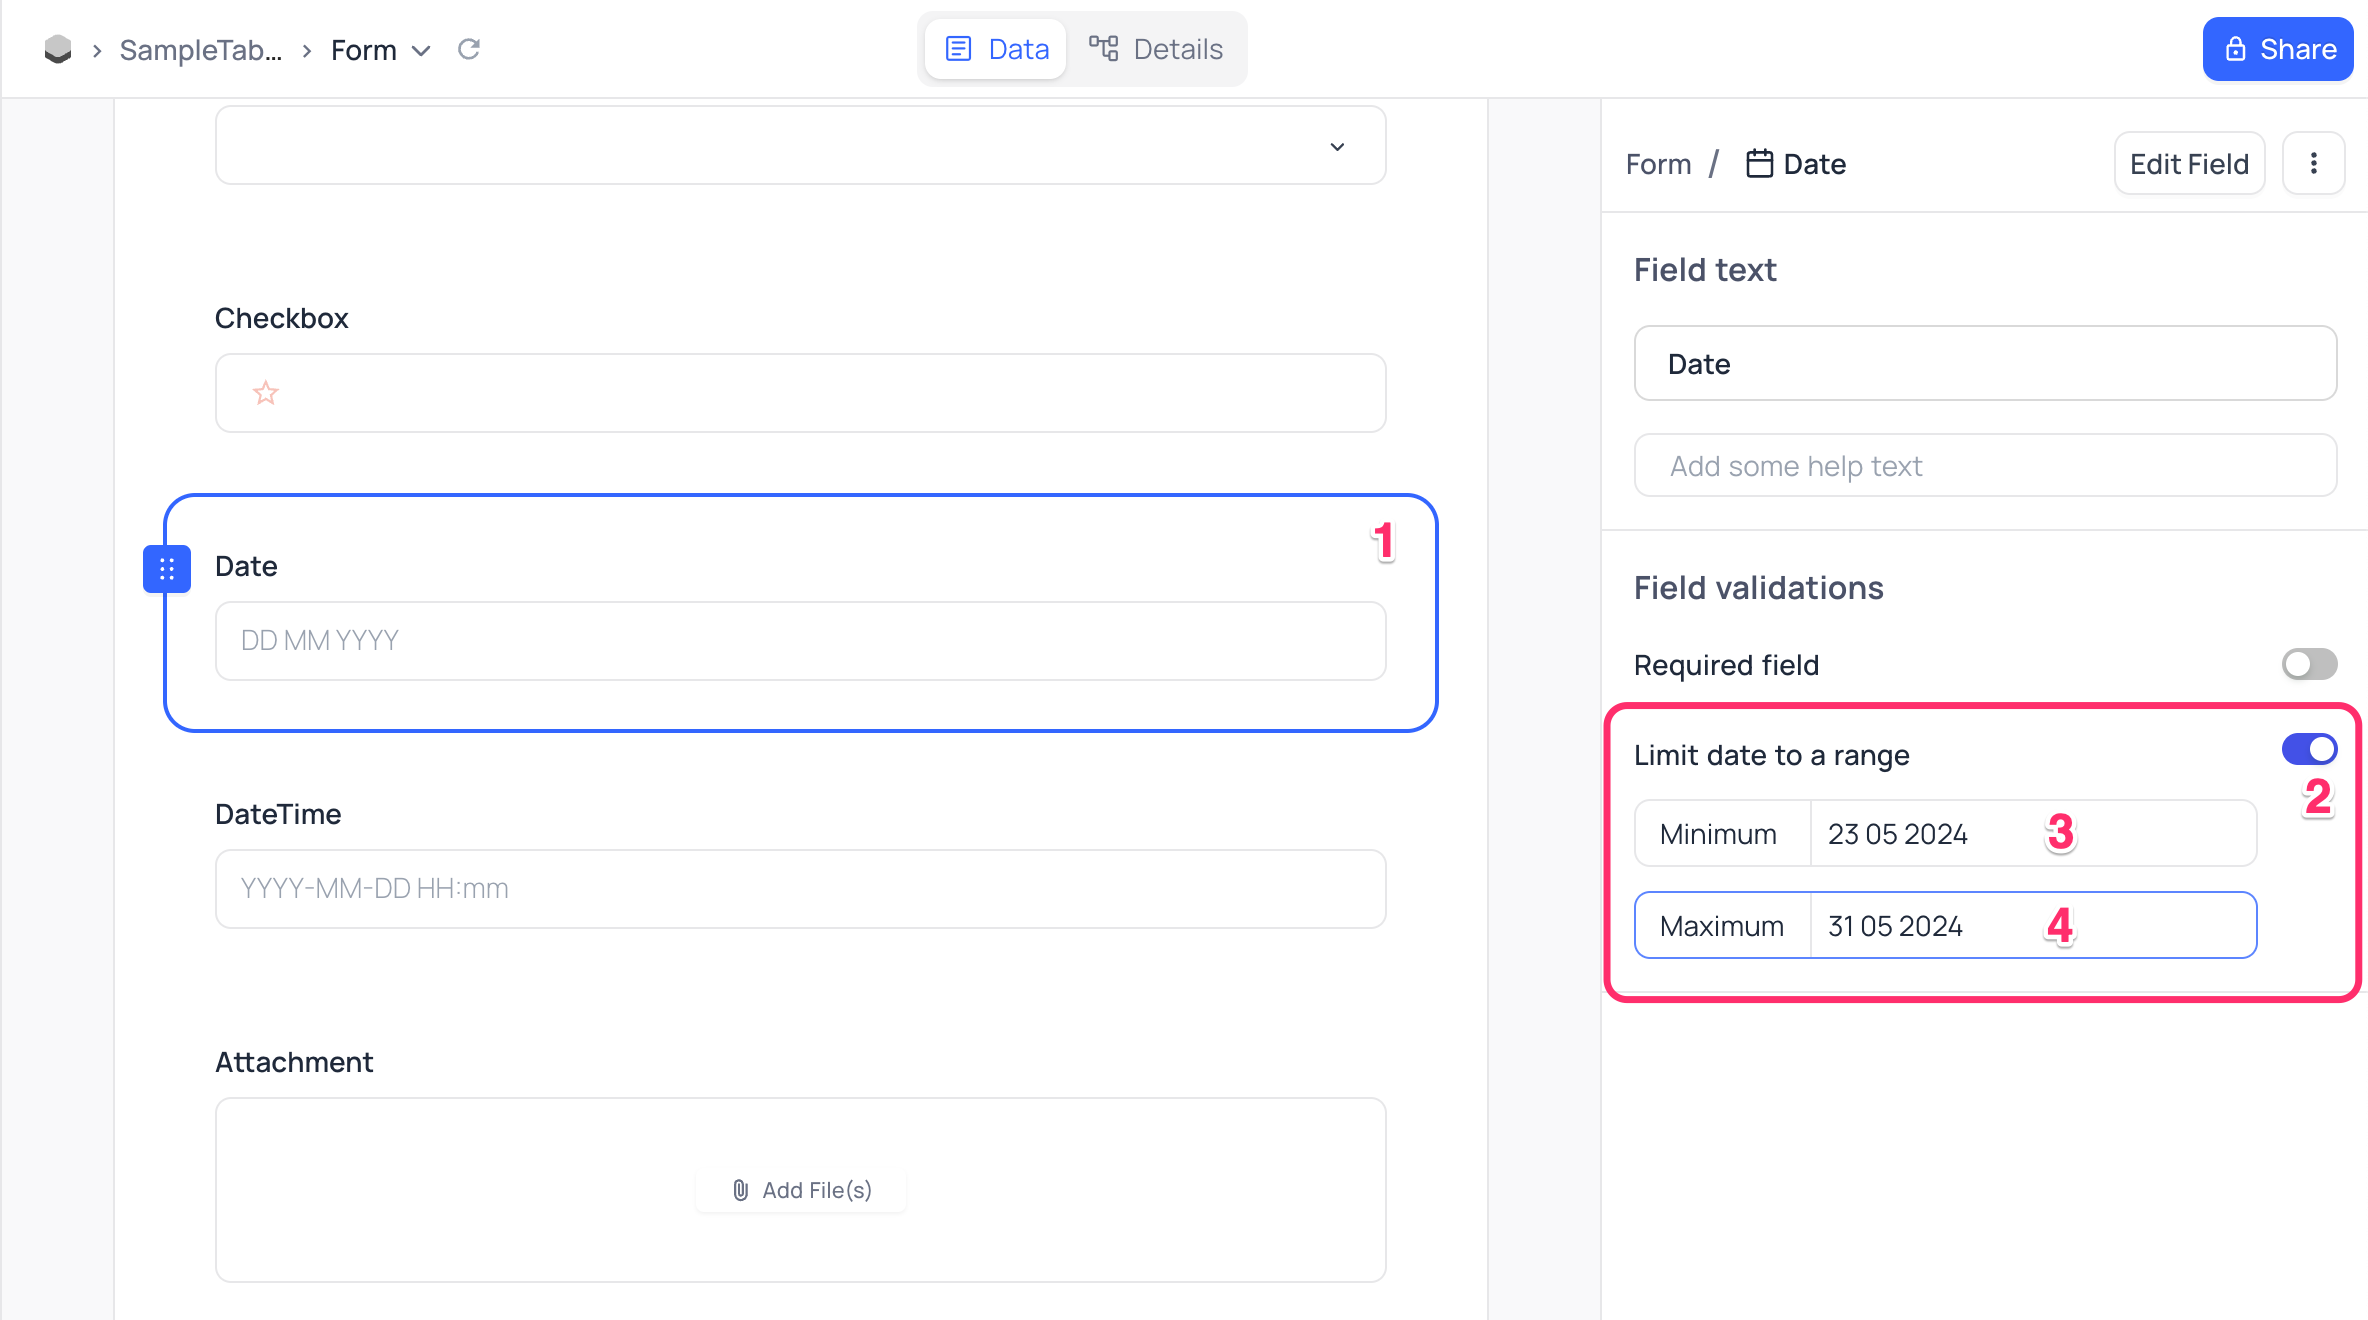
Date-based Field Types
For date-based field types Date Date & Time Time Year, you can configure the following validations:
- Minimum: Specifies the minimum allowed value for the field.
- Maximum: Specifies the maximum allowed value for the field.
- For both, date & date-time fields, only the date part is considered for validation.
- Value can be left empty to disable the validation.
Configuration Steps
- Click on the required field in the Form Area.
- In the right configuration panel, click on the toggle button next to
Limit date to a range - [Optional] Configure the minimum value allowed for the field.
- [Optional] Configure the maximum value allowed for the field.
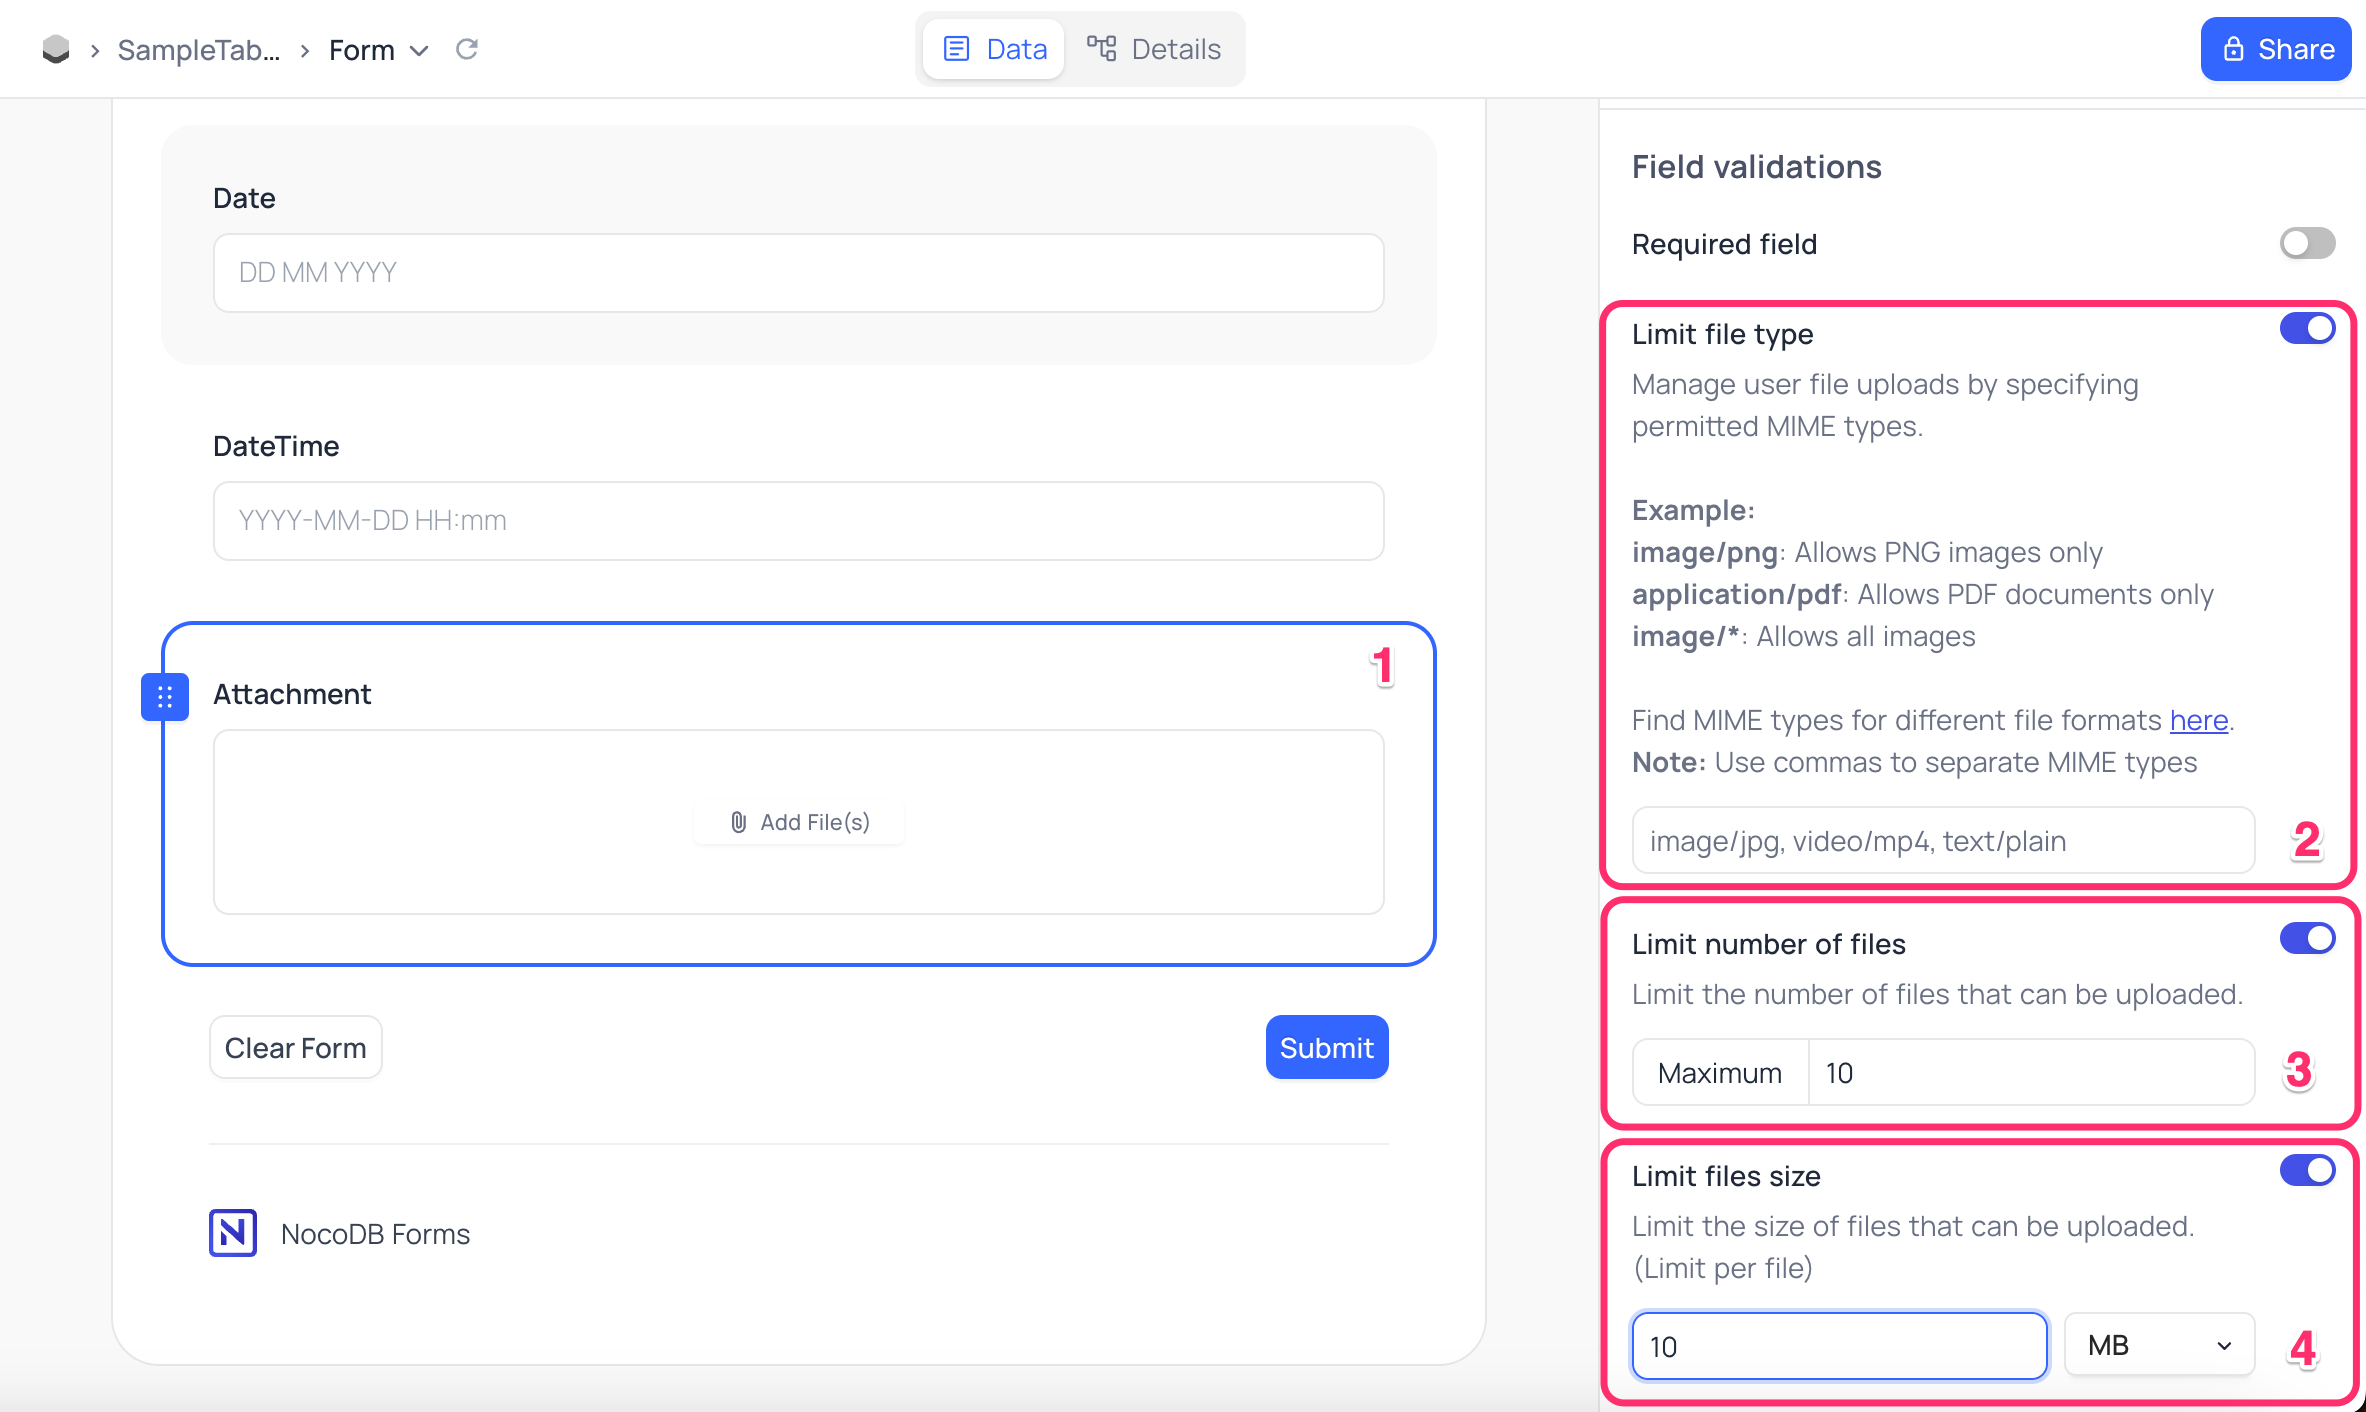
Attachment Field Type
For the attachment field type, you can configure the following validations:
- Limit file types: Allows you to restrict the file types that can be uploaded by specifying permitted MIME types.
Example
image/pngAllows only PNGsapplication/pdfAllows PDF documents onlyimage/*Allows all images
- Limit file size: Specifies the maximum file size allowed for the attachment. Size can be either in KB or MB.
- Limit number of files: Specifies the maximum number of files that can be uploaded.
- MIME types should be separated by a comma. Find MIME types for different file formats here.
- File size limit specified is the maximum size allowed for each file, not the total size of all files.
Configuration Steps
- Click on the required field in the Form Area.
- In the
Limit file typessection, enter the permitted MIME types separated by a comma. - In the
Limit number of filessection, specify the maximum number of files that can be uploaded. - In the
Limit file sizesection, specify the maximum allowable file size for the attachment.
Check out this video for a more detailed explanation with examples:
Field "Show On Conditions"
Conditional fields in Form View allow you to control the visibility and behavior of chosen fields based on specific data entered in previous fields. You can dynamically hide or show form fields when certain filter conditions are met. This enables a tailored form experience, displaying only relevant fields based on user input.
Note that, for constructing the condition, you can only use fields that are present in the form & are defined prior to the field for which the condition is being set. This also limits reordering of the fields in the form - reordering of the fields will be allowed as long as the condition requirement above is not broken.
To enable conditional fields in Form View, Open form-view builder & follow the steps below:
- Select the field for which you want to set the condition.
- On the right side configuration panel, click on the Settings icon next to
Show On Conditionto open the conditional field settings. - Click on
Add FilterORAdd Filter Groupto add new condition(s) as required.
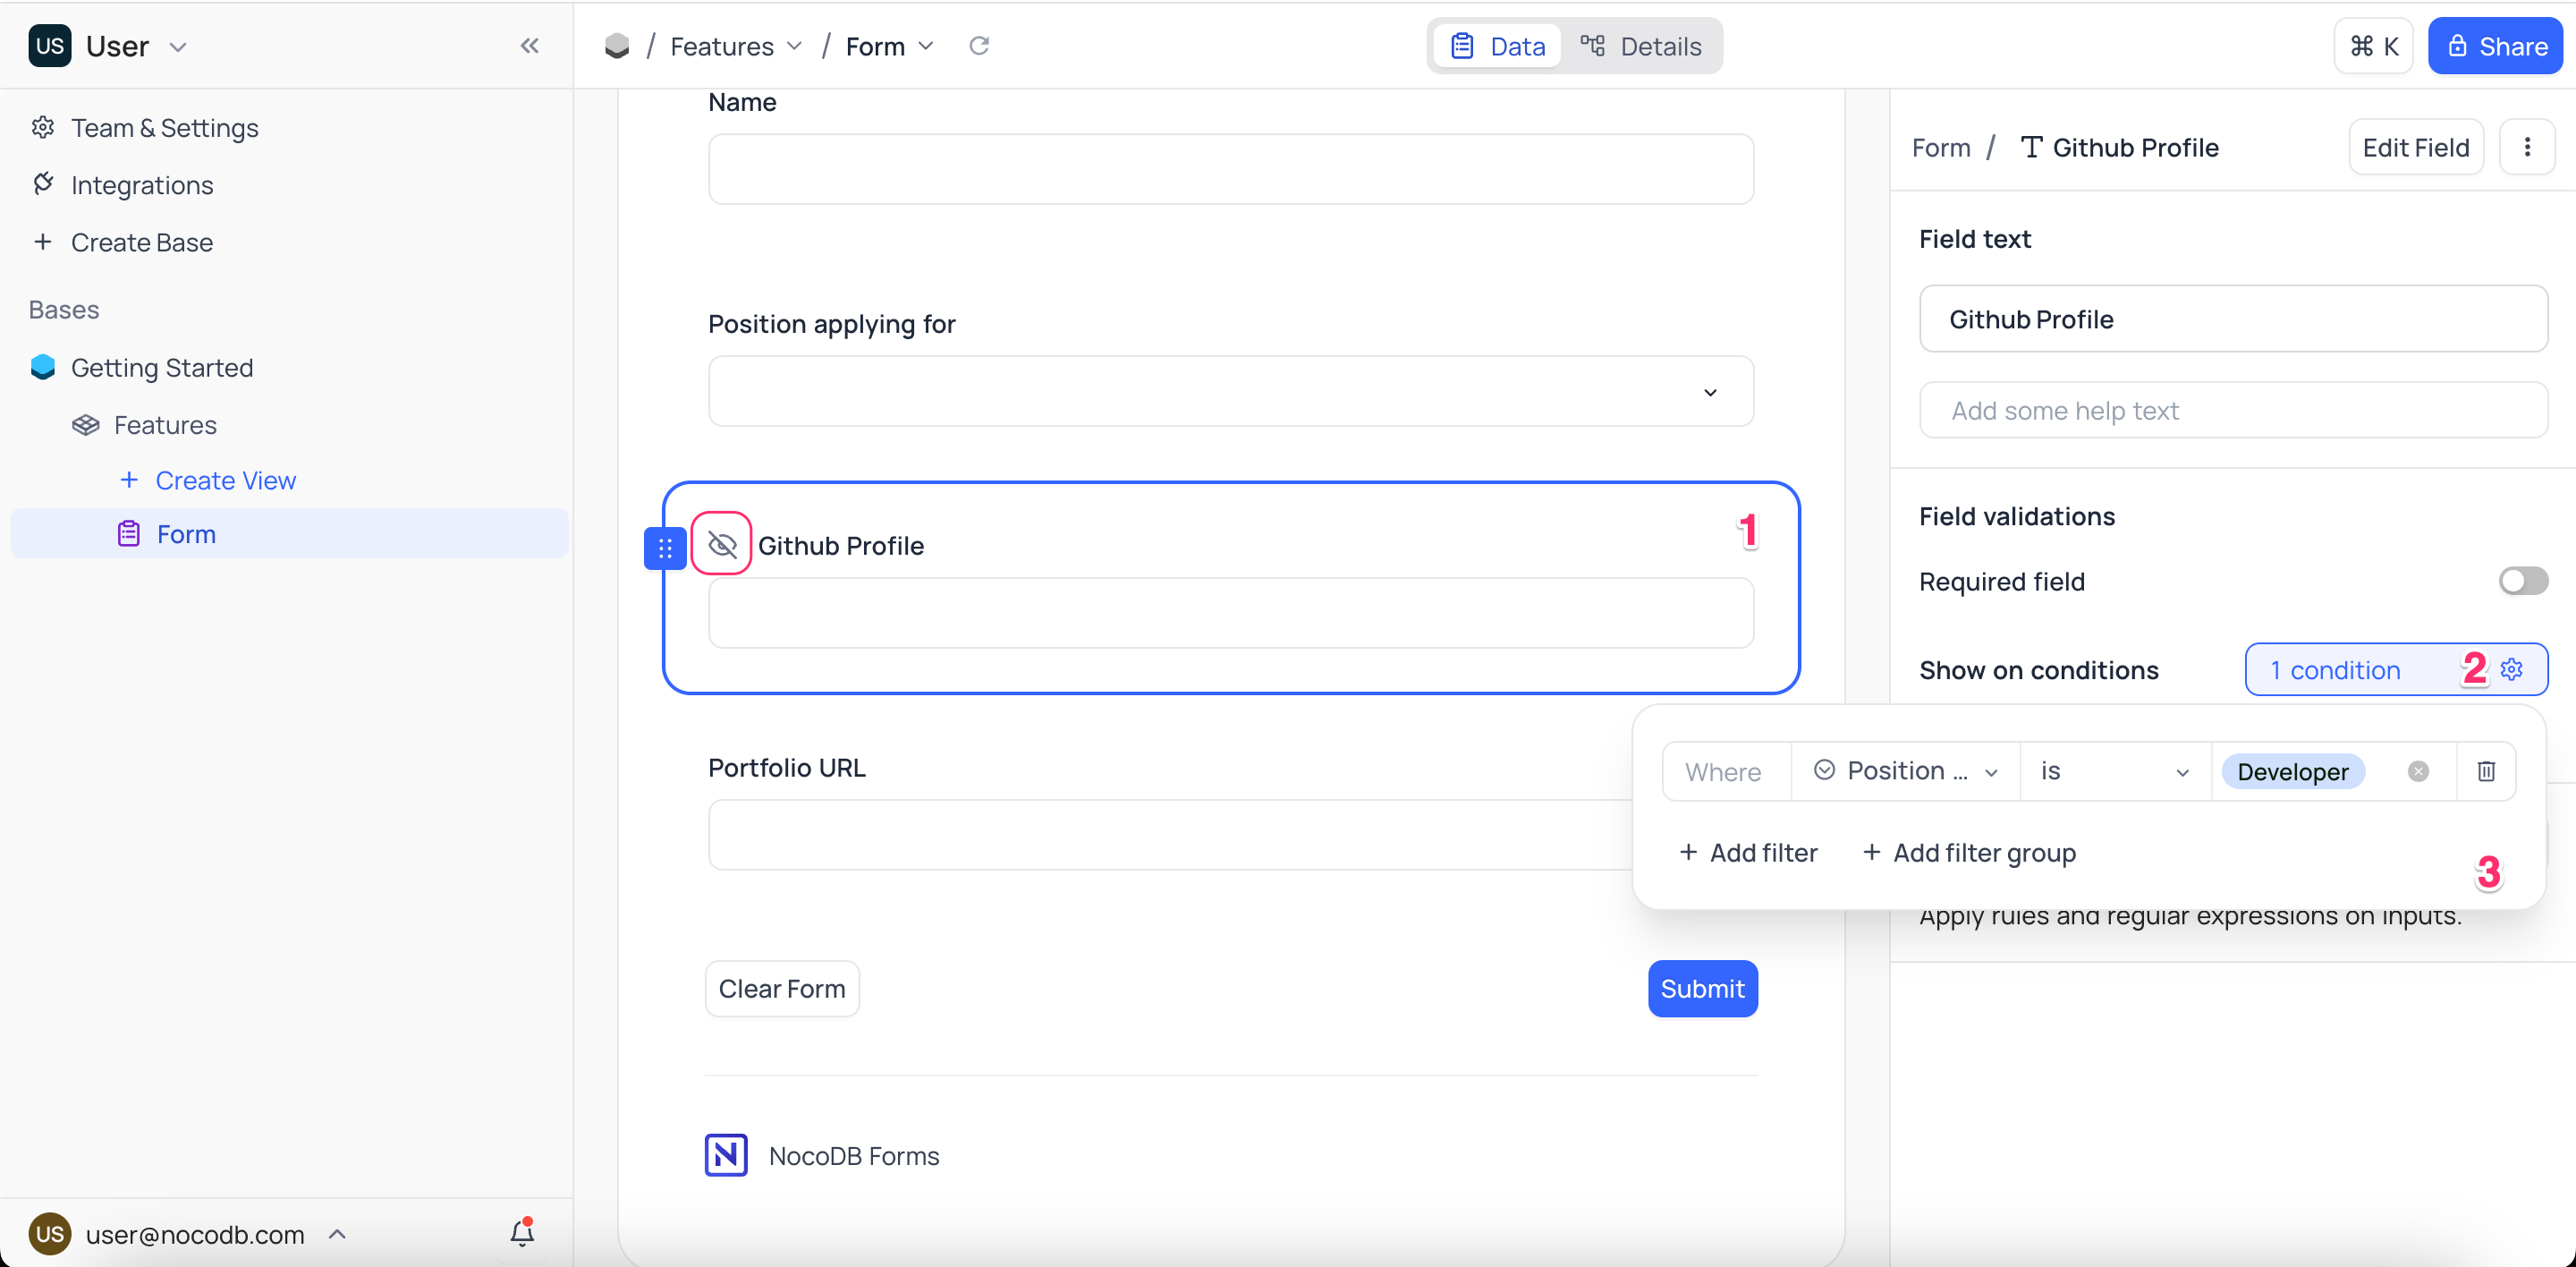
NocoDB suffixes an eye icon next to the field name in the form builder to indicate that the field is conditionally visible.
Pre-Filling Form Fields
NocoDB offers a convenient feature that allows pre-filling form fields with specific values by setting URL parameters. This functionality enables the creation of custom URLs with desired field values, streamlining data entry and enhancing user experience.
To construct a pre-filled form URL manually, ensure that the URL parameters are appropriately encoded in the following format: ?key1=value1&key2=value2.
For instance, the URL https://wh8s5w.noco.to/#/nc/form/66da06-f074-47af-ace7-fde46df55?Status=Qualification&Priority=Very+high pre-fills the Status field with Qualification and the Priority field with Very high.
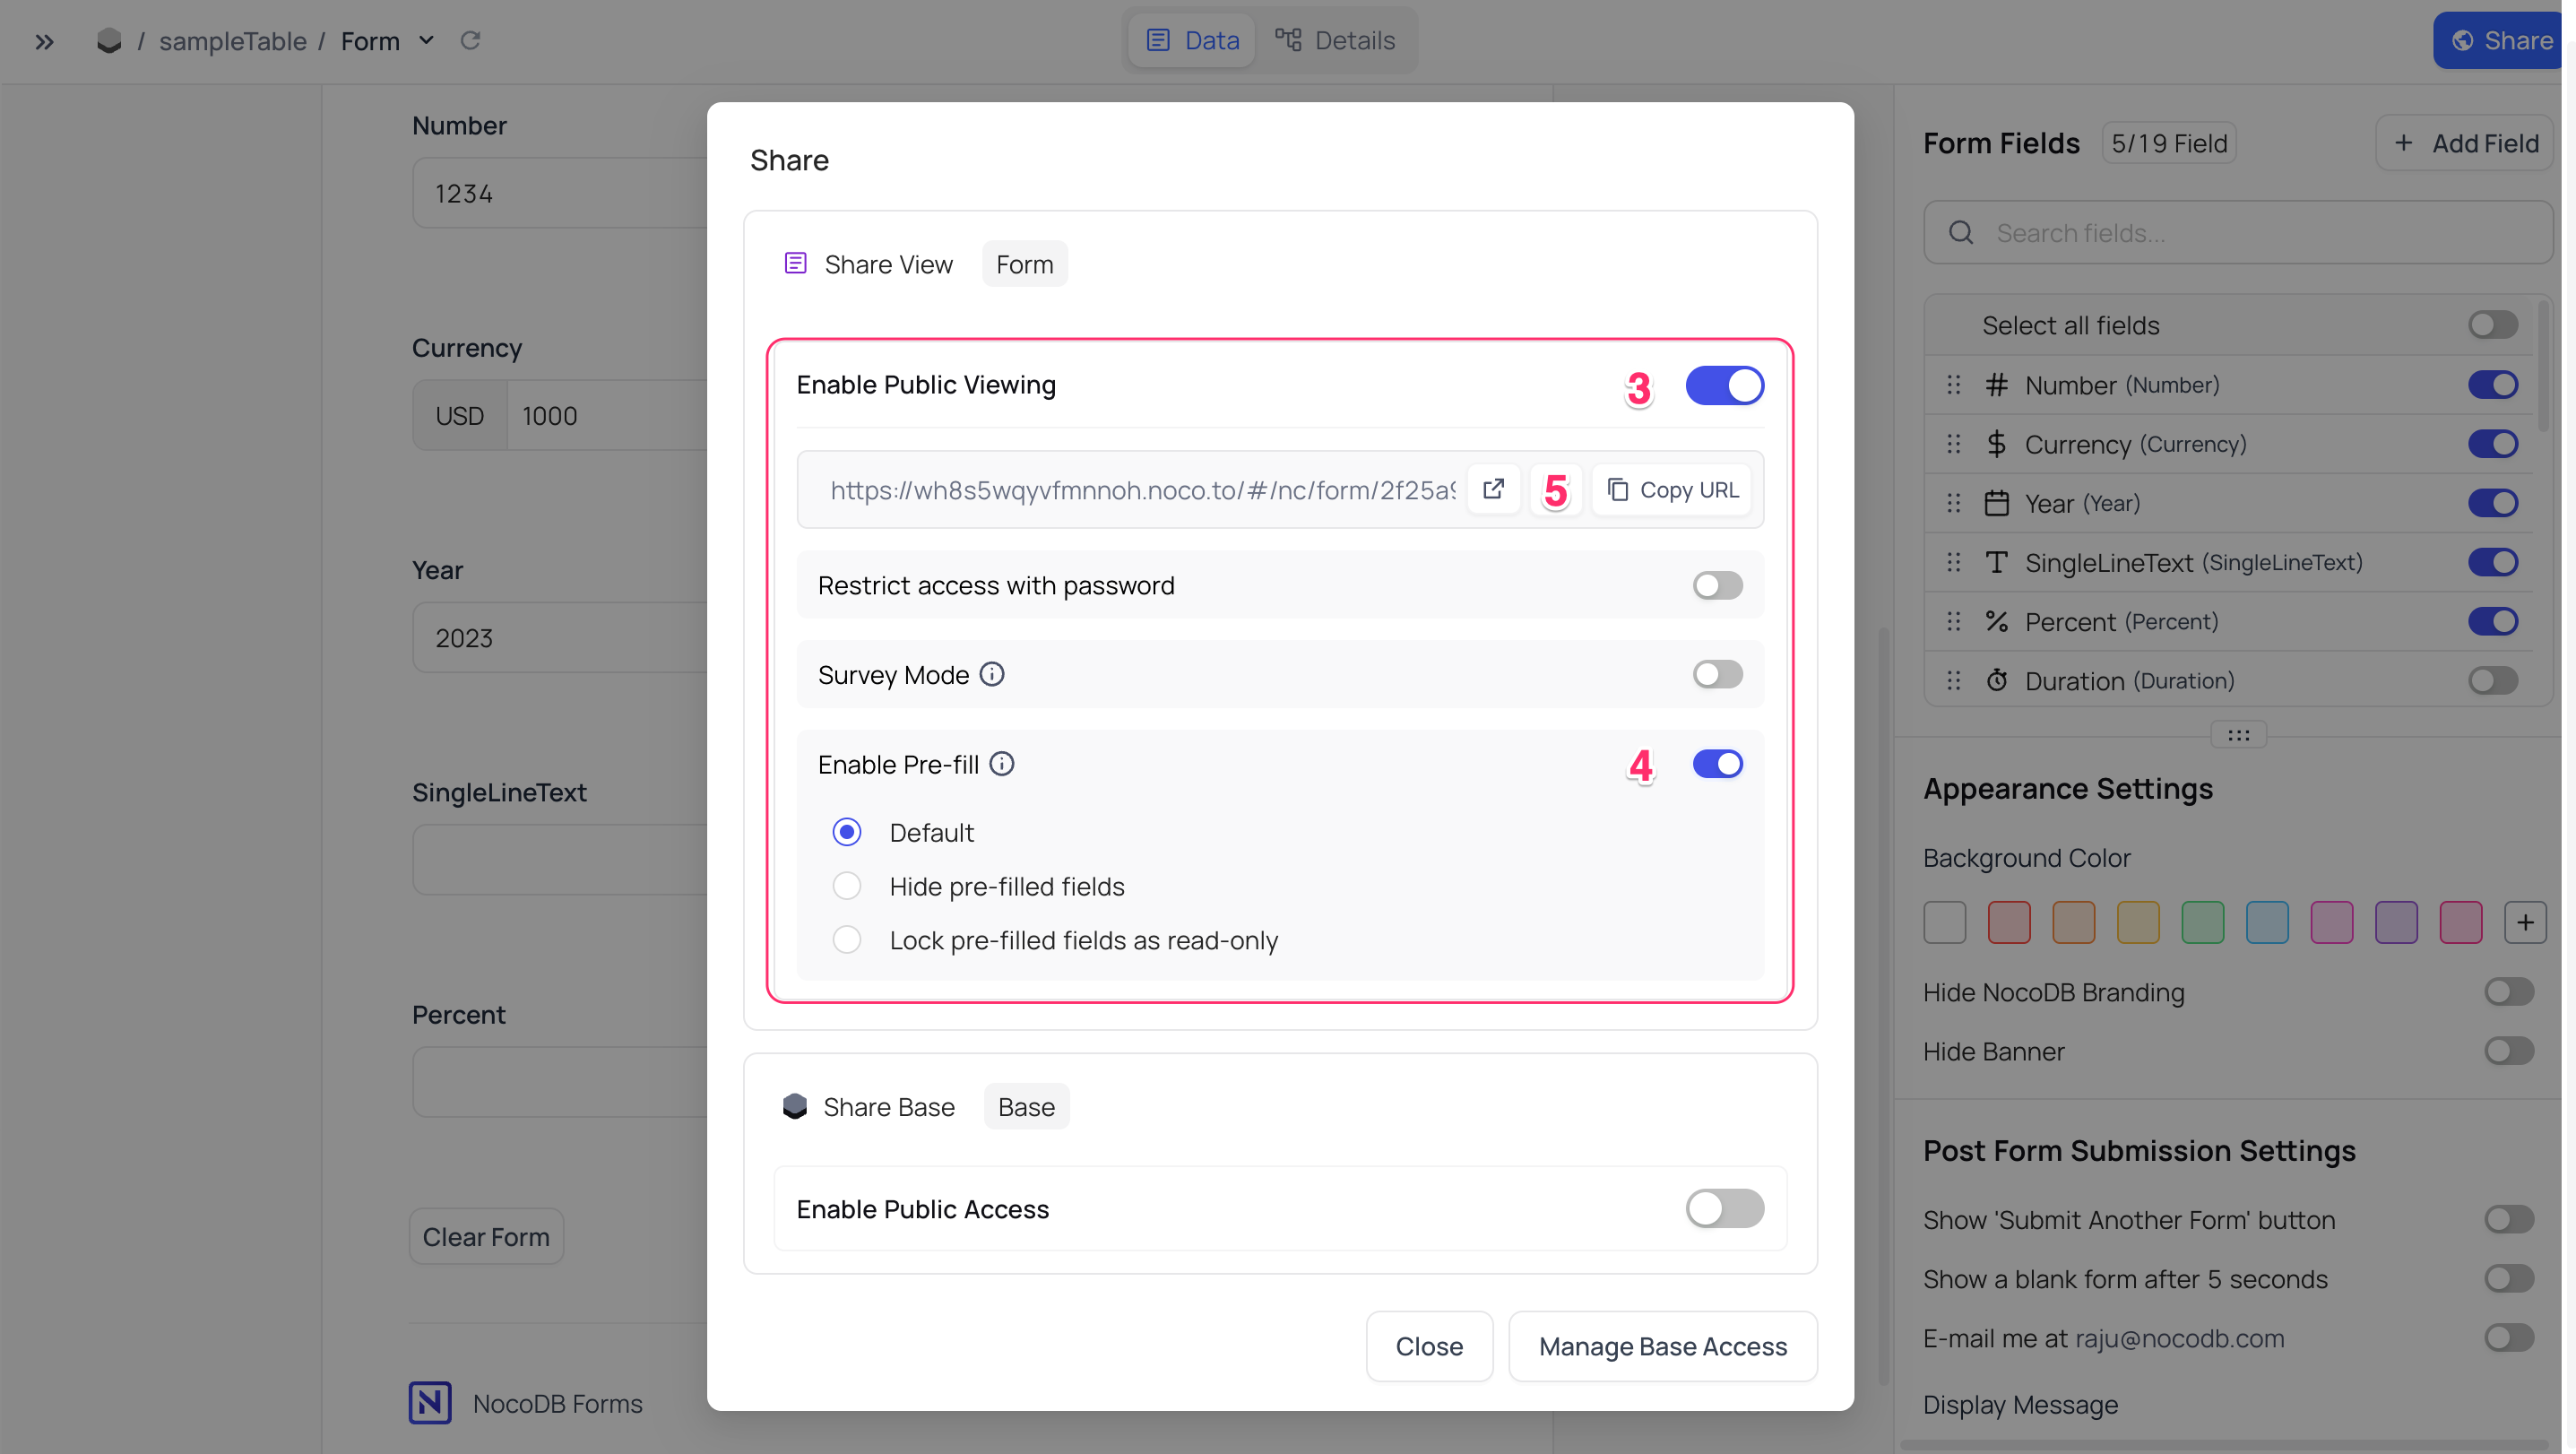
NocoDB provides an intuitive alternative approach to generate pre-filled URLs through the form builder.
- Open the form builder and pre-fill the required form fields with the desired values.
- Click on the
Sharebutton located in the top right corner. - Toggle the
Enable Public Viewingbutton to enable sharing. - Toggle the
Enable Prefillbutton to enable pre-filling. - Click on the
Copy Linkbutton to copy the pre-filled URL.

- Prefilled fields override the default values if any were set for this field in the table
- Maximum length of the URL is 8000 characters.
Pre-fill Modes
-
Default: Standard mode. This mode will prefill the form fields with the values set in the shared form URL. Users can edit the prefilled fields in the form. In the image below, the
Numberfield is prefilled with the value1234,Currencyfield is prefilled with the value1000andYearfield is prefilled with value2023.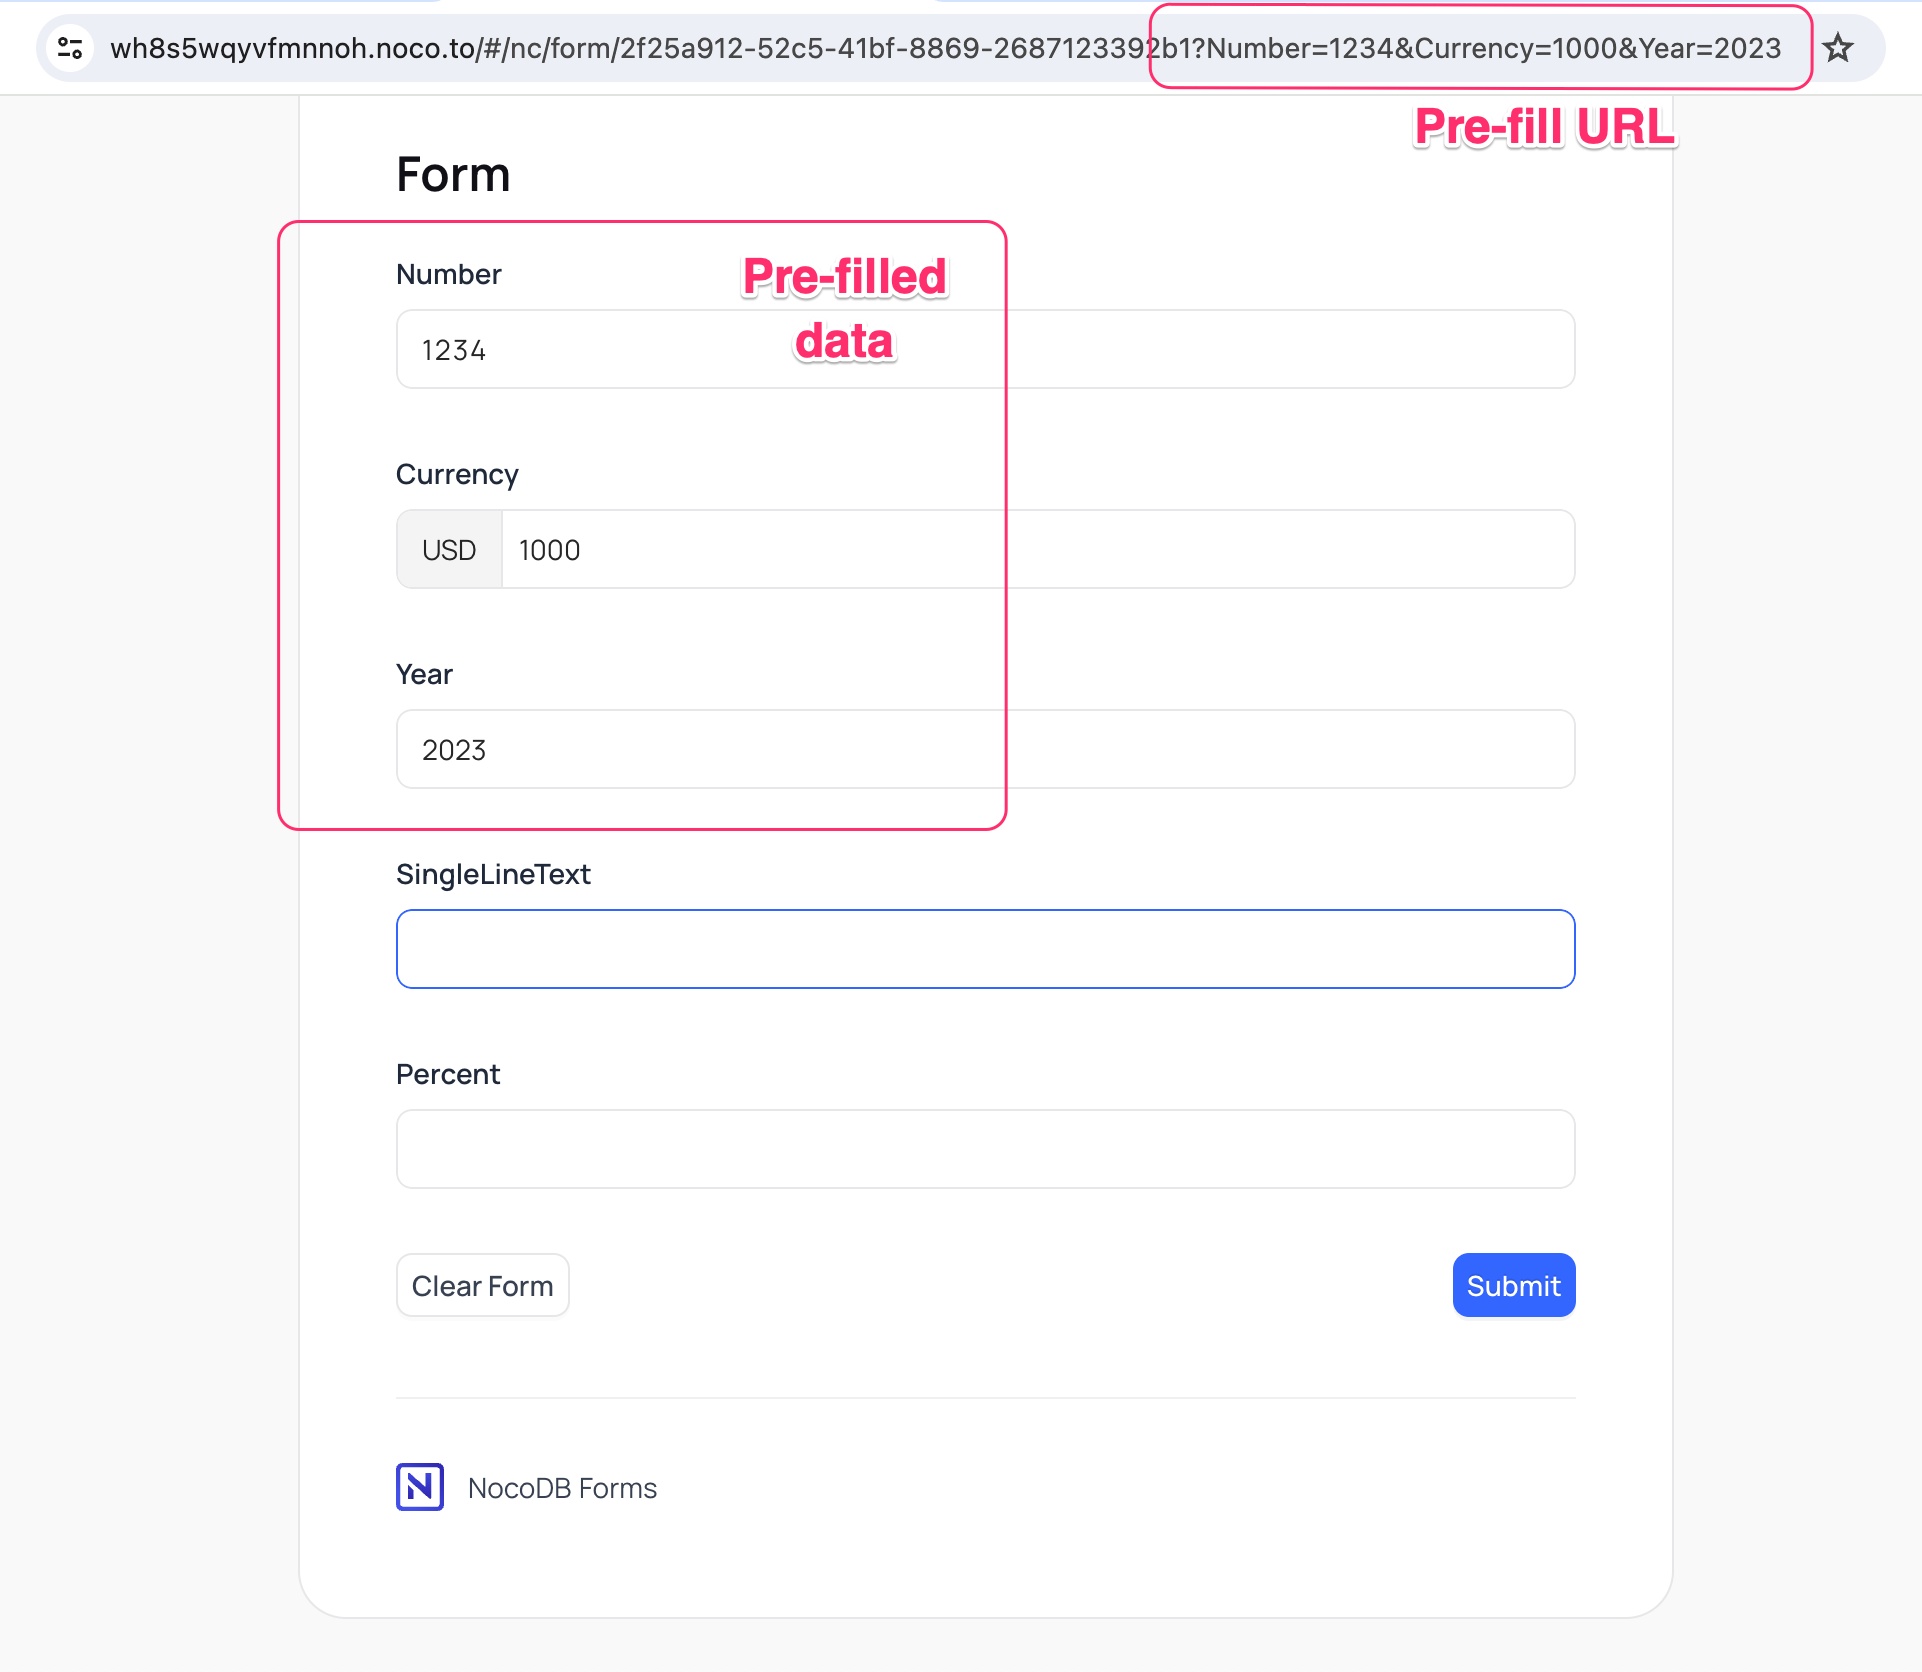
-
Hide prefilled fields: This mode will prefill the form fields with the values set in the shared form URL but will hide the prefilled fields in the form from the user. In the image below, the
Numberfield is prefilled with the value1234,Currencyfield is prefilled with the value1000andYearfield is prefilled with value2023.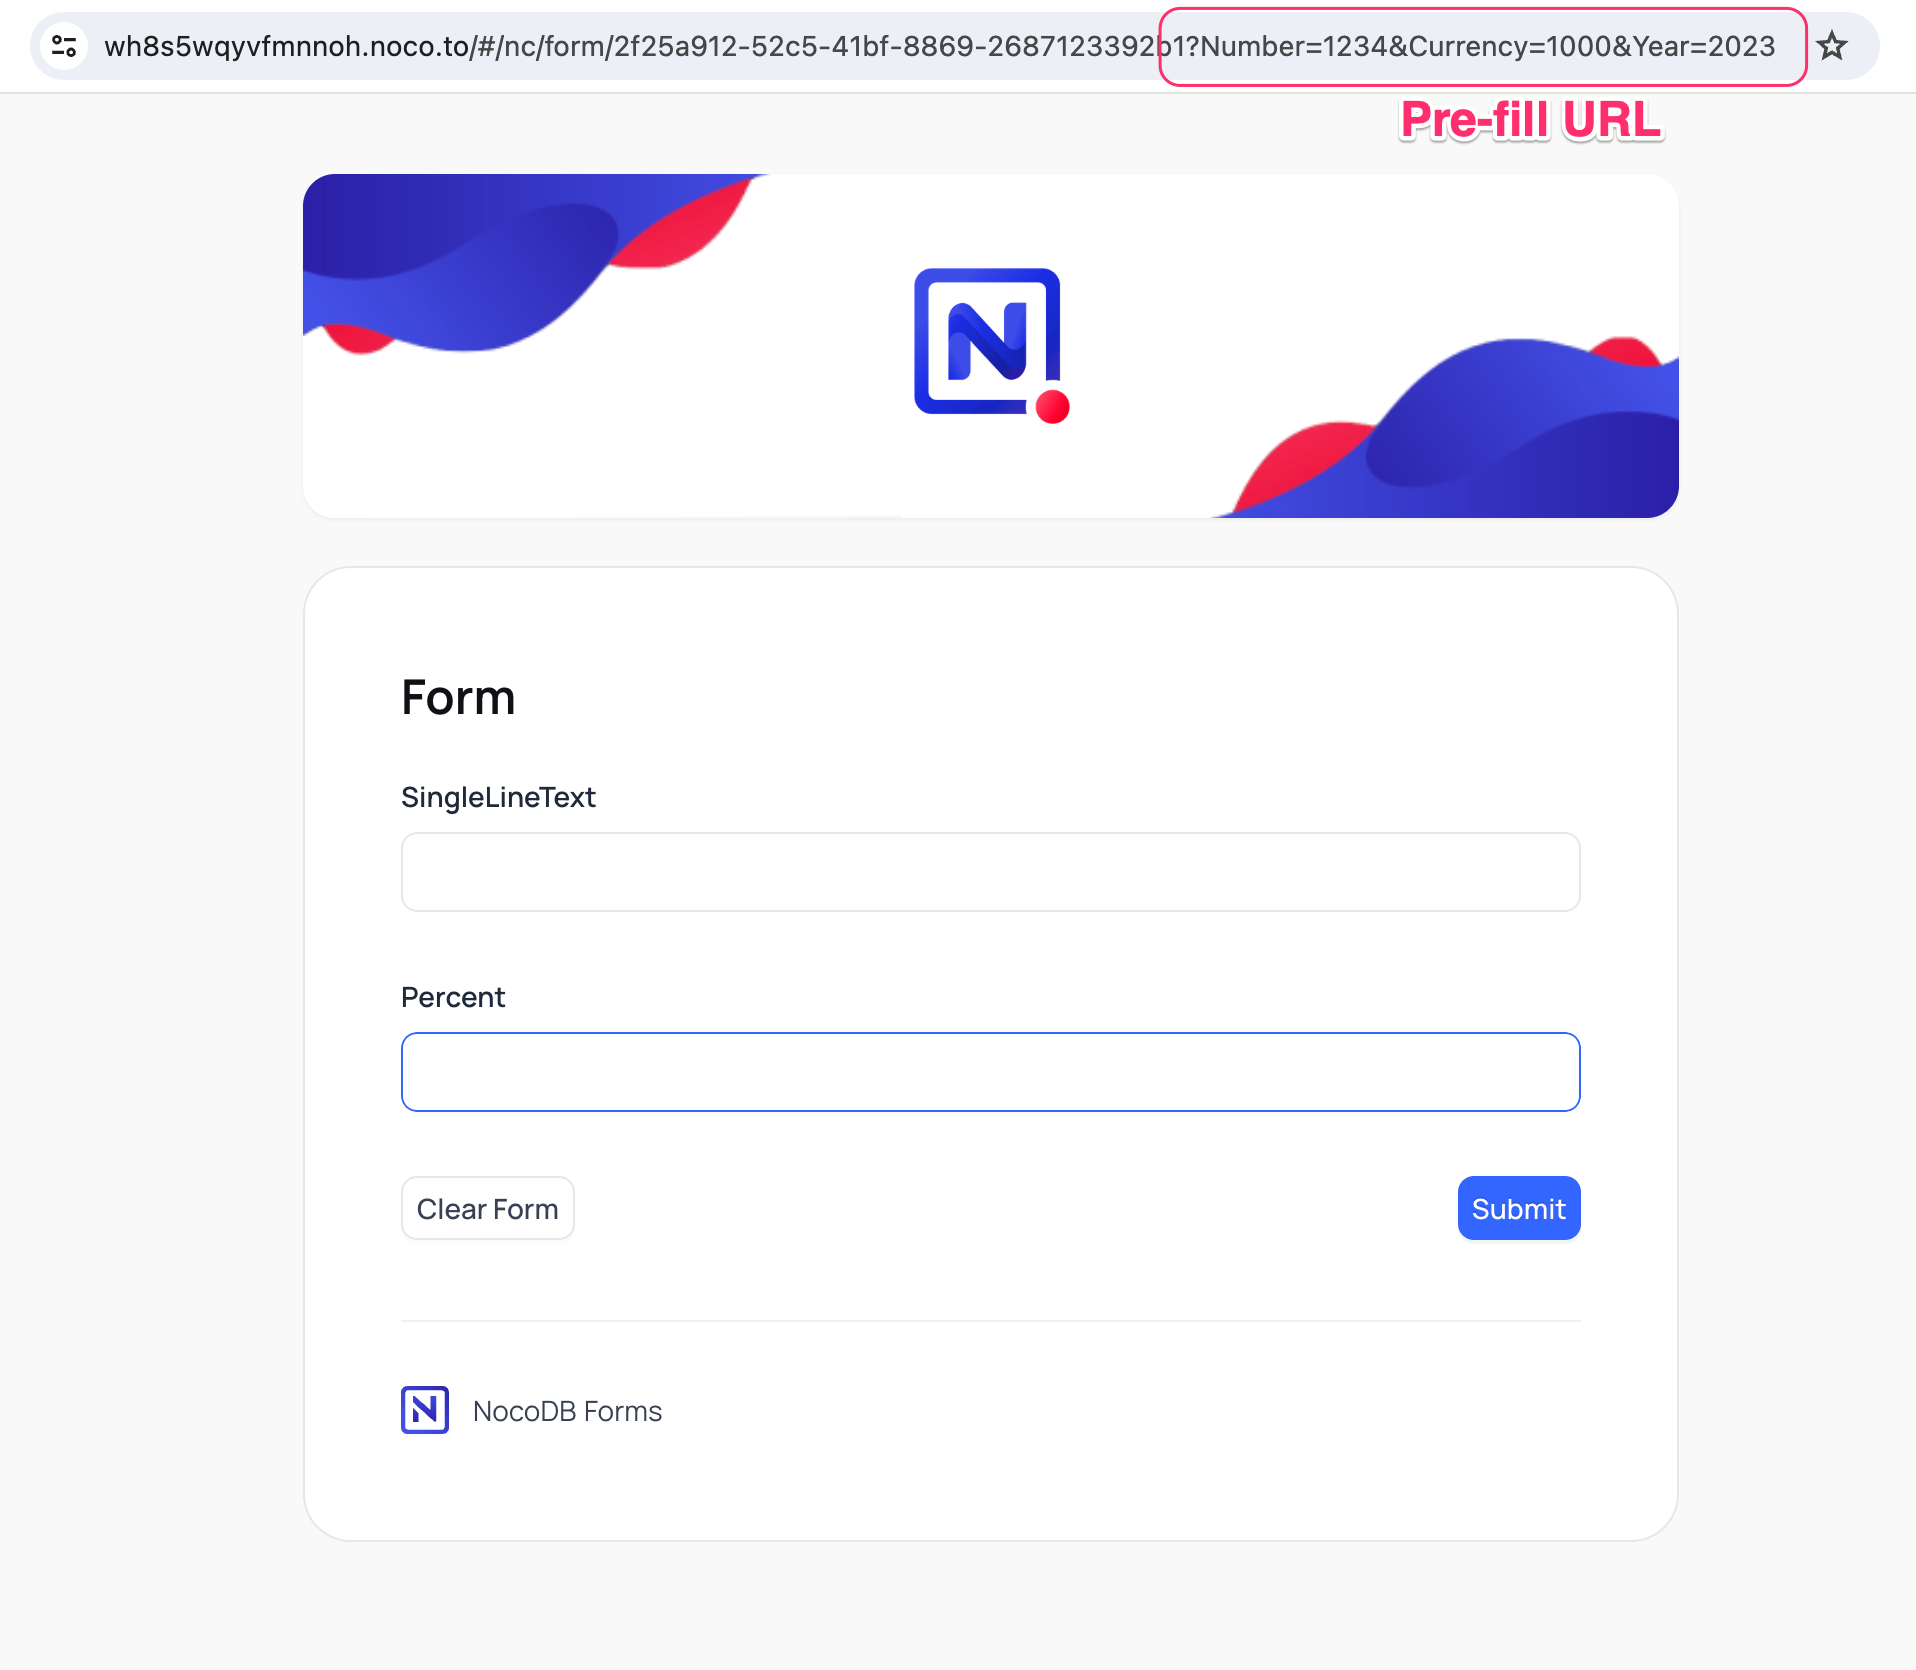
-
Lock prefilled fields as read-only: This mode will prefill the form fields with the values set in the shared form URL and will lock the prefilled fields as read-only. In the image below, the
Numberfield is prefilled with the value1234,Currencyfield is prefilled with the value1000andYearfield is prefilled with value2023.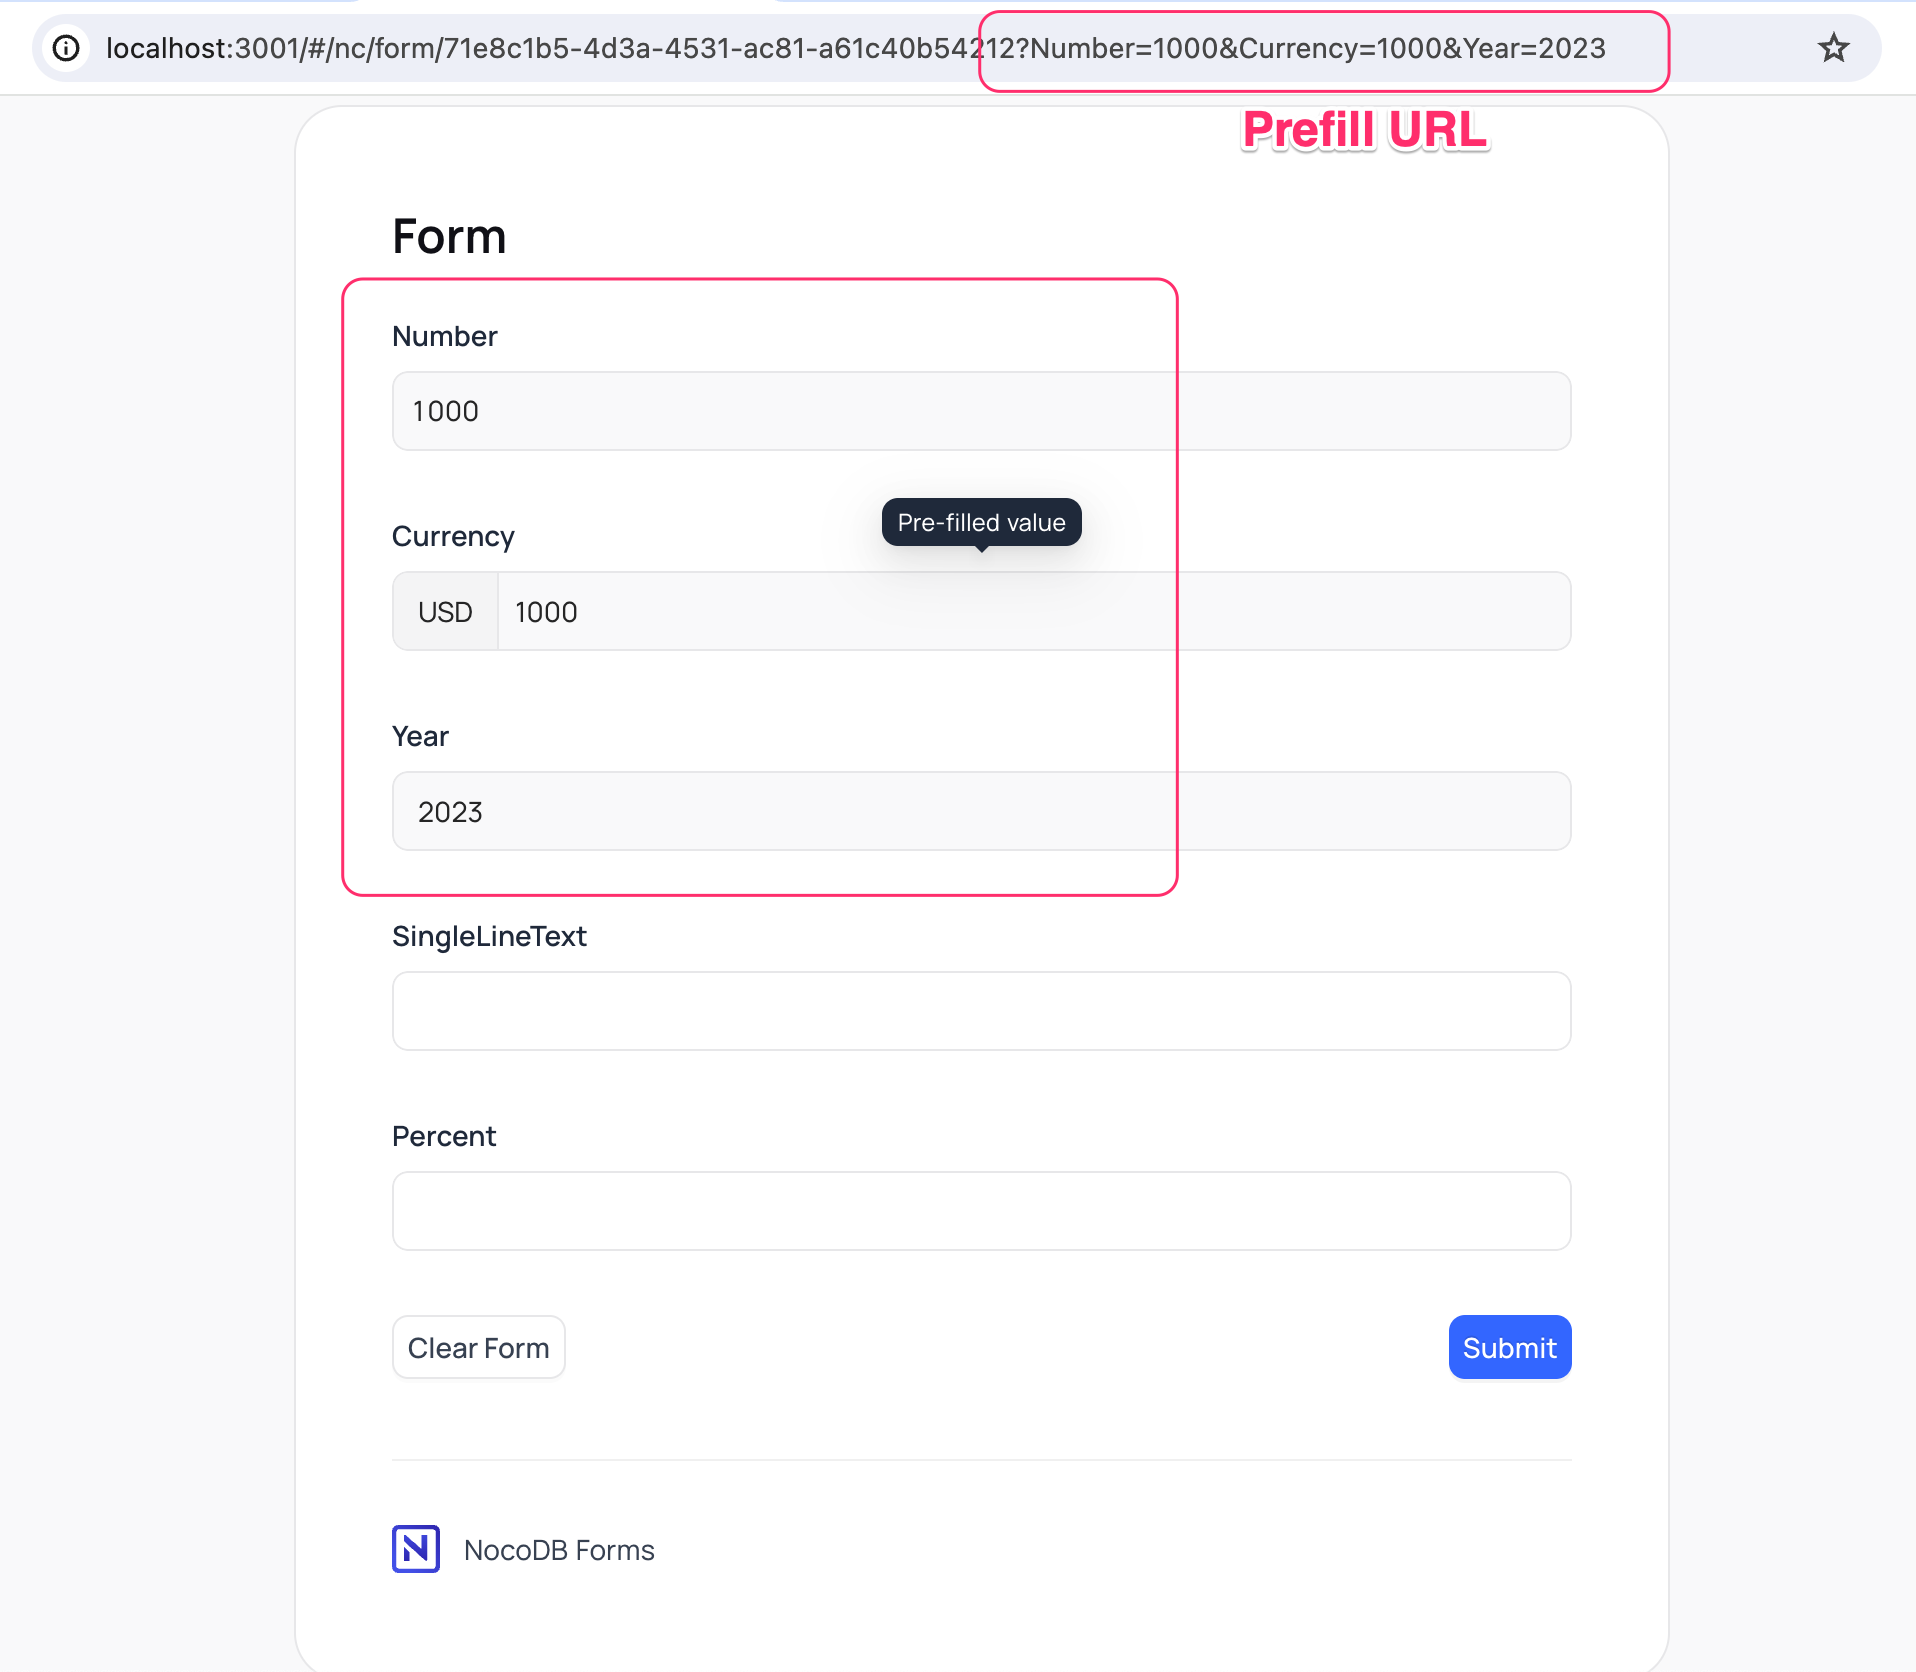
In any of the modes, the user can still change the prefilled fields by editing the URL.
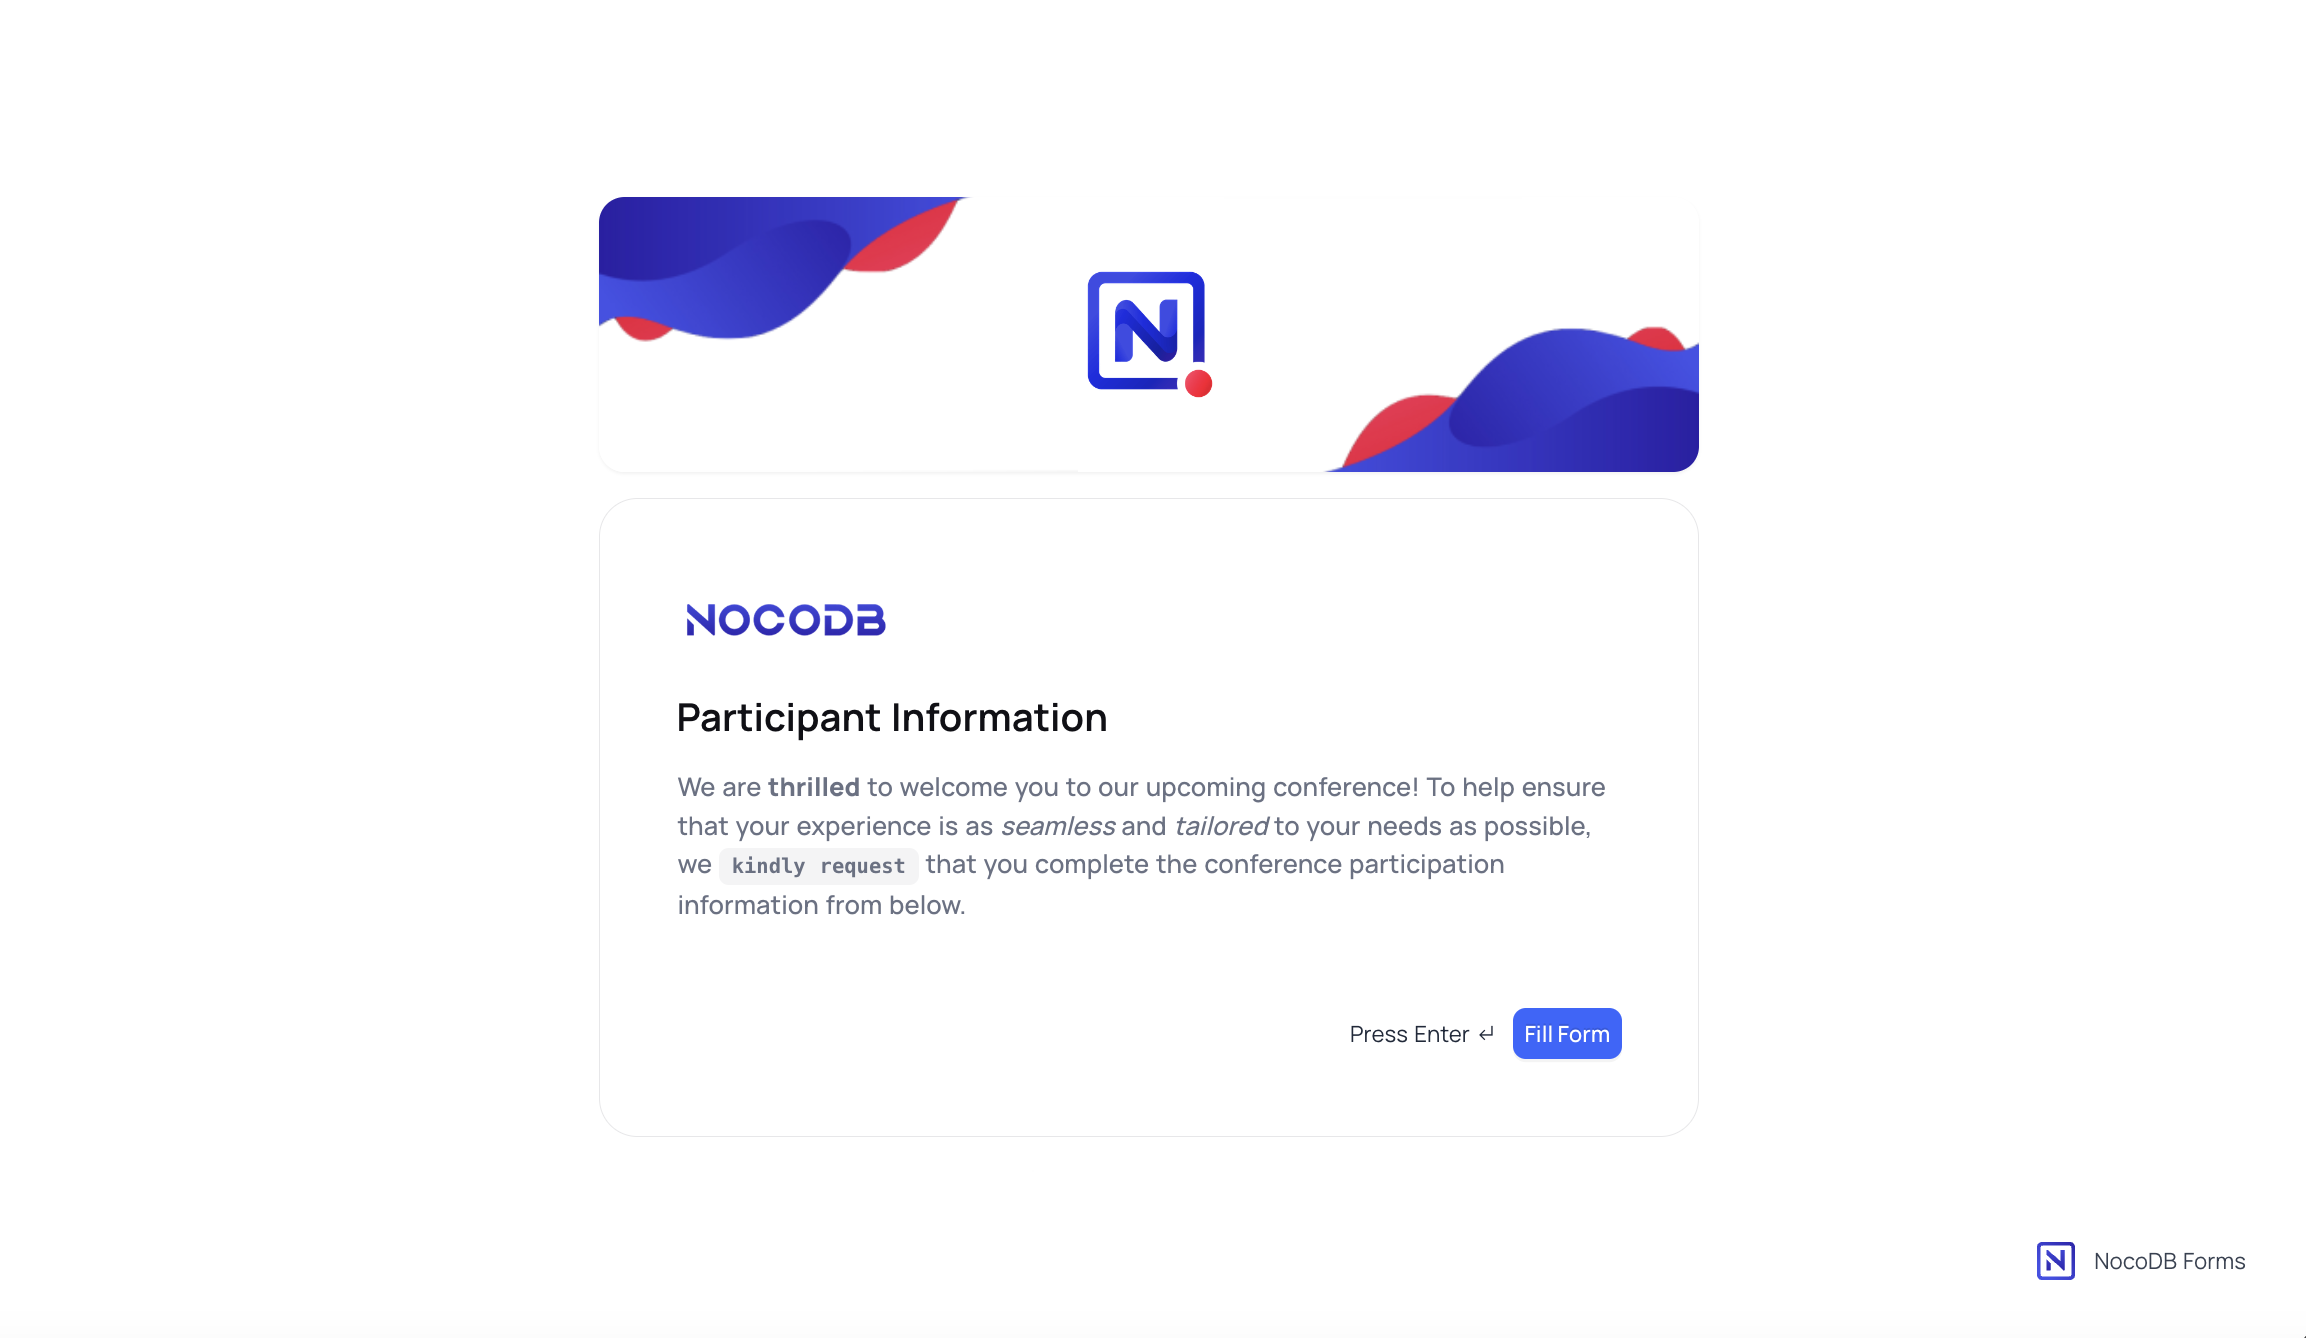
Survey Form View
NocoDB supports a special type of form view called Survey Form View. This view is ideal for creating surveys & questionnaires. This view can be enabled by toggling the Survey Mode switch when creating shared form view.
Check out this video to see how you can utilize the Survey Mode:
When Survey Mode is enabled,
- Form input fields will be displayed one at a time.
- Users can navigate between fields using the
<&>buttons.
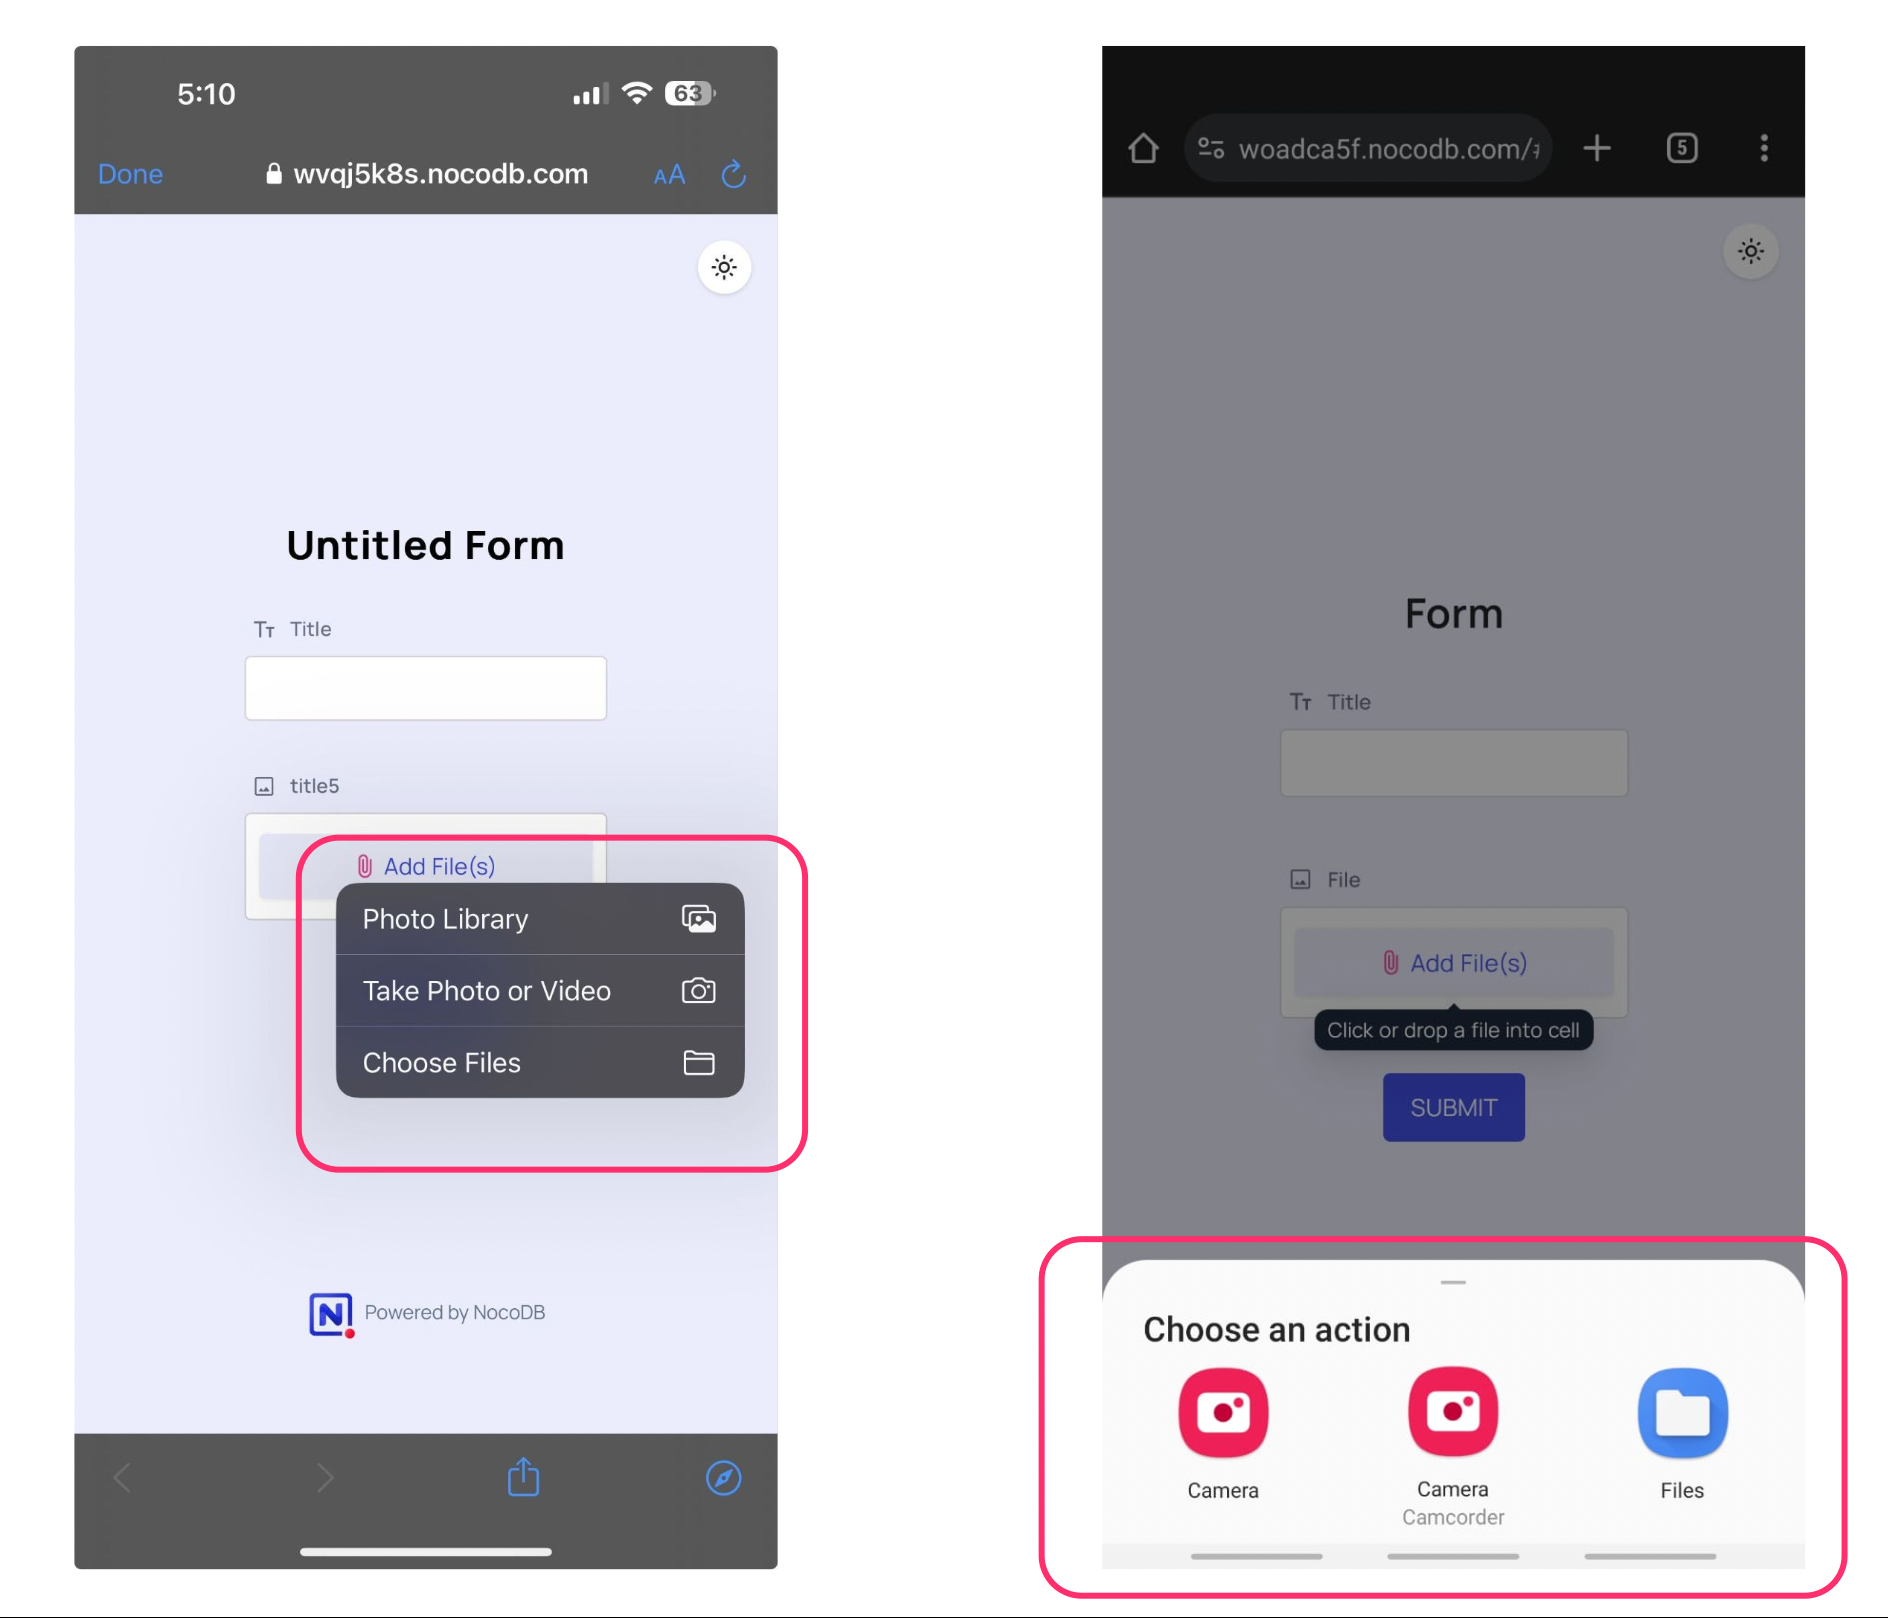
Attaching a file from mobile device
To attach a file from mobile device,
- Click on the
Add File(s)button in attach field - Sample options could be (varies from device to device)
- Camera : use this if you wish to take a picture
- Files : use this if you wish to attach a file from your device